Contractor’s Field Guide to The Building Envelope 

What is the Building Envelope and why does it matter? How can it fail? What role does tape play in air sealing?

In this post, we demystify the building envelope, helping builders and contractors identify weak spots in building tightness in order to improve air sealing, and create more structures that are sustainable, cost-effective and comfortable in all conditions.


What is a Building Envelope?

By nature, we do not expect our environment to maintain a consistent, 74-degree-Fahrenheit, 50% humidity, climate.

Our perception of comfort is quite adaptive and is based on circumstance, the expectation of environmental conditionals and activities.  We use umbrellas when it’s raining. We dress in layers when it’s cold. We use sunscreen when exposed to summer’s intense UV rays.

And yet, we expect our homes to provide thermal comfort and protection from the natural elements, at a consistent 74-degrees, every day.

Walls, roofs, windows, and doors all play a role, but really it’s the building envelope that makes this possible.

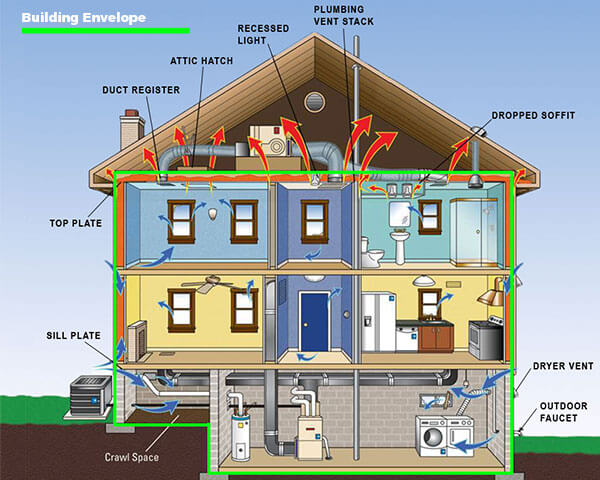
At its simplest definition, the building envelope is the exterior or shell of a building that repels the elements.

At its most complex definition, it’s an engineering system that meshes elements such as structural integrity, moisture control, temperature control, and air pressure boundaries into a single design strategy.

It is the physical separator between the conditioned and unconditioned environment of a building including the resistance to air, water, heat, light, and noise transfer. It’s the part of the house that you can draw a line around: the roof, the walls, and the foundation.  

While the building envelope is a silhouette of sorts, it’s important to remember that these are compounded layers. Each part of the building envelope must be thought of as a collection of smaller pieces working together to provide structural support.

The way the foundation and walls are built is essential in creating a sturdy structure, or a base, for the rest of the building. This is one of the main functions of construction because a well-constructed envelope is necessary to simply keep the structure standing.

The building’s design must be measured and carried out meticulously to ensure that there are no open edges, cracks between the windows and walls and imperfections between the roof and the walls, or between the walls and the foundation. It is all included within the building envelope concept.

That said, each part of the enclosure faces different challenges.

  • Roofs are bombarded by heat, rain, and hail
  • Walls contend with wind and rain
  • Foundations are always surrounded by wet, damp earth

On a construction level, the home’s building envelope is a series of composite layers —whether it be wood, glass, veneer, drywall, etc. — each with their own permeable properties that must be considered.

A proper building enclosure works together to achieve the same goals of stopping or slowing the flow of air, water, and heat while still allowing the inevitable intrusion of water as a way to dry out.


Why Do Building Envelopes Matter?

Understanding-the-Building-Envelope | ECHOtape.com
Understanding Air Flow, Air Sealing and the Building Envelope | Image via U.S. EPA

All told, building envelope components work together to perform four basic, but critical functions: structural support, moisture management, temperature regulation, and air flow.

The latter three—moisure, air and thermal—characterize the “control” functions of the building envelope, those facets that ensure a house is energy efficient, comfortable, and sustainable.

1. Moisture control. The most important element of the envelope’s control is its ability to regulate the transfer of moisture. Moisture presents a distinct danger to the overall integrity of a building and must be taken into account.

Moisture can and will impact your building over your head (roof), under your feet (basement/floor), and on your sides (walls). Each component must be addressed to prevent unwanted transfer from causing expensive damage. It’s essential in all climates, but cold climates and hot-humid climates are especially demanding.

2.  Air control. Controlling air flow is key to controlling energy consumption, ensuring indoor air quality, avoiding condensation, and providing comfort.

Control of air movement includes flow through the enclosure or through components of the building envelope itself, as well as into and out of the interior space. So, for example, when we talk of a house’s draftiness, we’re talking about the control of air flow.

3. Thermal control.  Thermal transfer brings to mind how comfortable we feel inside our own homes.

Is it too hot? Is it too cold? If you want to address this question, it is easiest to look up. As we learned in elementary school, heat rises, and if you don’t have enough resistance in the building to prevent heat from rising right through the roof, it is time to raise your building envelope IQ to prevent heat (and money) from escaping.


What is Building Tightness?

Building envelopes are often characterized as either “tight” or “loose.”

A loose building envelope allows more of a natural air transfer to occur, which improves indoor air quality which can remove the need for mechanical ventilation.

These types of building envelopes make the building more drafty and uncomfortable, it also makes the building harder to regulate temperature levels. This creates a higher chance of mold or mildew, and higher quantities of heated or cooled air are able to escape through leaks in the loose building envelope. This will increase energy bills along with negatively impacting the environment by releasing more greenhouse gases.

A tight building envelope allows for a high level of control over indoor air quality, temperature, humidity levels, and energy consumption.

This requires more insulation, caulk, adhesive tape, sealants, and energy-efficient windows to acquire a tight shell for the building. This leads to fewer drafts and a more comfortable building for its occupants, which often results in less waste in heating and cooling costs.

Tight envelopes also have a lower chance of producing mold or mildew from moisture infiltration, this can help prolong the life of the building components. The downside to a tighter building envelope is it requires more extensive mechanical ventilation systems because it limits how much natural ventilation can occur.

Additionally, good building envelopes which prevent drafts and other air leaks allow for tighter control of the air pressure inside as well as the temperature.

Without that, cooling and heating sources are constantly fighting the exterior elements that are making their way inside the building. Not only is this expensive, it makes being inside the building uncomfortable. For example, a home where the air conditioning system has been shut off all weekend would take longer to cool on Monday morning if the building design allows for leaks and drafts.

The tight envelope provides the ability to adequately control the quality of the air, making the interior of the building more comfortable and pleasant.


What are Best Practices for Building Envelope Systems?

We’ve said it before and we’ll say it again:  Build it tight; vent it right.

Without a virtually airtight, well-insulated building envelope, achieving the energy performance levels required for current IECC Building Codes and  California Title 24 is nearly impossible without a massive investment in renewable energy systems.

The good news for builders is that getting the building envelope right is one of the lower-cost, higher-return investments when designing for net-zero performance. It all boils down to good building practices.

According to ProBuilder.com, to make air sealing your top priority, concentrate on insulation.  Focus on sealing the areas along the top and bottom plates, particularly around the perimeter in the attic area and along the foundation, whether it’s a basement, crawlspace, or slab, so that you’re not getting convective loops in your walls.


Why Do Building Envelope Systems Fail?

When the building envelope system is designed and constructed properly, very few occupants pay attention. But when the building envelope fails (and even the best-built projects do in time), everyone notices.

Those failures can include aesthetic loss, corrosion, poor indoor air quality, energy inefficiencies, and, in some cases, life-threatening structural failure and eventual litigation—a builder’s worst nightmare.

1. Design deficiencies. Architects occasionally specify materials or design systems that are inappropriate for their intended use. Common mistakes include specifying materials that are incompatible with materials with which they come into contact or have inadequate performance criteria for thermal movement, structural capacity, or water penetration resistance.

Issues also arise when subcontractors try to reduce the weight, size, or amount of building envelope components (aluminum, glass, sealants, flashing, etc.) required on a project. This can lead to inadequate performance or capacity of the materials specified.

2. Material failure. It’s also common for properly specified materials to fail to meet the published performance levels. This could be a result of errors in the manufacturing, handling, or storing of the product or components within the product.

Common examples include degrading sealant adhesion, laminated glass delamination, and metal fatigue. While the anticipated performance levels are often based upon measured statistical performance, the strength of materials varies.

3. Poor workmanship. During construction booms, the problem of poor workmanship is exasperated as a result of having many inexperienced, unsupervised, and untrained personnel working on projects. It is common to find building envelope components not installed per the manufacturing specifications.

Word to the wise: Putting the right people in the right job goes a long way toward proper installation and overall profitability.

4. Acts of nature.
Even with flawless installations, bad things can happen to good work when environmental conditions exceed those that were anticipated during design. The effects of hurricane-force wind loads, driving rain, and extreme temperature fluctuations can overload a properly designed and constructed building envelope, causing damage to the system and making it vulnerable to further deterioration or failure.

While failures of this type cannot be stopped, many can be prevented through routine inspection and maintenance to identify small problems before they become big ones.


[echo_cta]

10 Reasons Contractors Should Use Tape to Seal the Building Envelope

As customers demand more energy-efficient homes and building energy codes become stricter, more and more contractors are using adhesive tape to seal the building envelope.

Today’s newer and higher-performing seaming tapes offer builders better choices and multiple advantages over conventional building materials.

These tapes actually stick better over time, are more durable and are more weather resistant. Indeed, modern adhesive technology is much more sophisticated as a whole.

But don’t just take our word for it.  Here are 10 great reasons to seal the building envelope with tape.

    1. No holes. Unlike nails or rivets, tape does not make holes. Fewer holes mean less opportunity for air leakage.
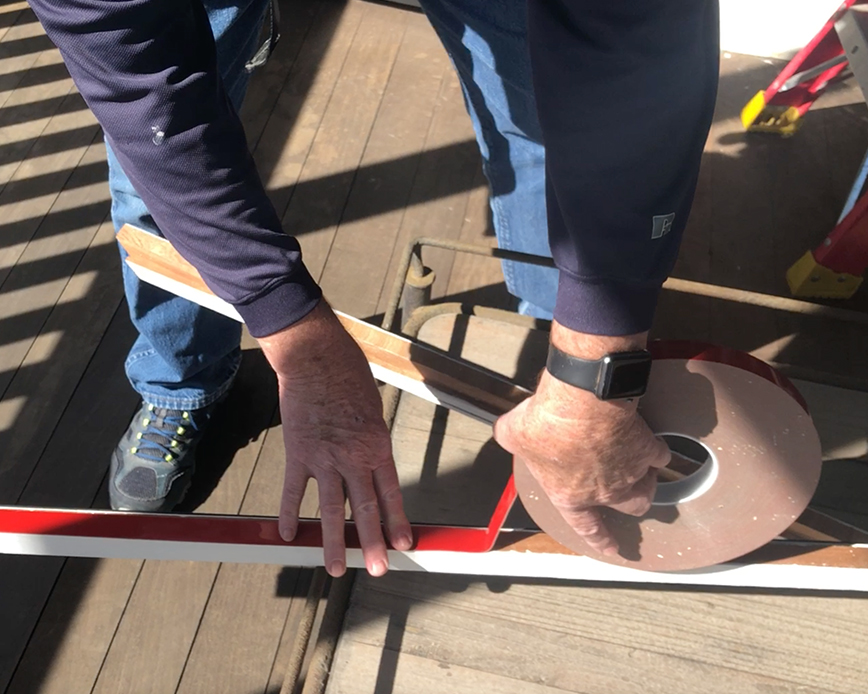
    2. Clean, easy application. Unlike liquid and foam sealants, adhesive tape is not messy and it’s easier to apply.
    3. It’s affordable. Using tape to seam is more affordable than spray foam or liquid adhesives.
    4. Versatility.  Unlike other construction materials, tape has a unique ability to withstand extreme temperatures, harsh environments and to bond securely with a host of different substrates and materials
    5. It’s energy efficient. Using tape to seal the building envelope is the standard in Europe where passive house (a.k.a. Passivhaus) is the norm. Passive Haus results in ultra-low energy buildings that require little energy for space heating or cooling. In fact, tape experts cite Europe as the best example of overall utilization of acrylic tapes in construction. “In Europe, they tape up everything when building or retrofitting to create an air-tight seal,” says David Joyce, nationally known construction and tape expert, and owner of Synergy Companies Construction LLC. “Energy costs are much higher there, and it’s a matter of necessity.”
    6. The Department of Energy recommends it. Direct quote from Building Energy Code Resource Guide: To limit air leakage, builders use tapes to seal the seams of a variety of membranes and buildings products, including housewrap, polyethylene, OSB, and plywood. Tapes are also used to seal duct seams, to seal leaks around penetrations through air barriers — for example, to seal around plumbing vents — and to seal sheet goods to a variety of materials, including concrete.
    7. The Green Building Advisor is obsessed with tape. Check out these articles: Backyard Tape Test and Air Sealing Tapes and Gaskets.
    8. Leaders in performance building, like Matt Rissinger, use it all of the time. Check out Tight House Construction and 4 Tips to Building an Efficient House, for example.
    9. And Hank Spies, who uses tape in metal roof sealing.  Quoted here:  The most effective approach is to seal all joints with butyl sealing tape…  It is more effective than caulk, and since the butyl does not cure, it tends to creep within joints to absorb the movement of the metal with changes in temperature. 
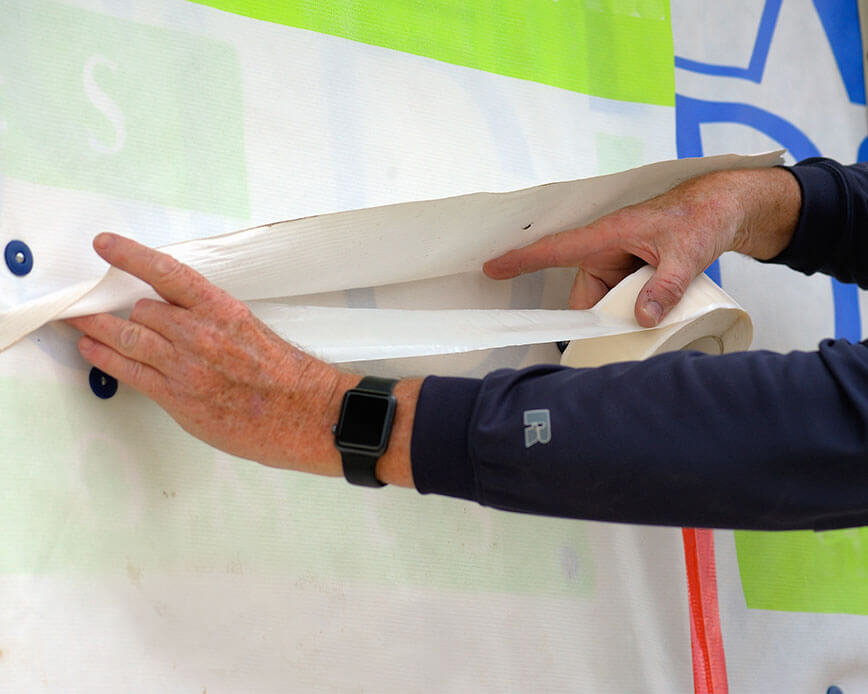
    10. Twice as nice. More and more builders are using double-sided tape as a housewrap tape so they can overlap seams and ensure no water gets through.

Clearly, the home’s building envelope is a critical concept to grasp. At ECHOtape, we’ve embraced the fact that a better building envelope leads to a healthier, more sustainable building.

We’re excited about the expanding role adhesive tape will play in building envelope design, or redesign, and our goal is to help builders and contractors find the weak spots in building tightness, improve air sealing, and create more structures that are sustainable, cost-effective and comfortable in all conditions.

Because a well-maintained and regularly observed building envelope doesn’t just save on energy bills; it will be better built to stand the test of time and mother nature.


Continuous Insulation – What is it and why do we care?

Everyone instinctively knows that when you go outside on a cold day, you must zip your coat to stay warm. It doesn’t matter how thick the coat is, if it’s left open, your body heat will leak out.

The same is true with building insulation — no matter its R-value (thermal performance), if insulation isn’t continuous throughout the building envelope like a zipped coat, heat will escape – wasting energy and money. Hence the term continuous insulation.  


What is Continuous Insulation?

Continuous insulation, also known as outsulation, is defined in American Society of Heating, Refrigerating and Air-conditioning Engineers 90.1 (ASHRAE 90.1),  as: 

“Insulation that is continuous across all structural members without thermal bridges other than fasteners and service openings. It is installed on the interior, exterior, or is integral to any opaque surface of the building envelope.”

To help ensure well-insulated buildings, since 2012,  the International Energy Conservation Code (IECC) has required continuous insulation (CI) in the building envelope. The 2012 IECC prescribes how much insulation is required for each of the 8 U.S. climate zones, for various types of above-grade walls, below-grade walls, roofs, and floors.

Notably, this requirement eliminates the use of fiberglass batts installed between wall studs as the sole means of insulation, which had been common practice in construction for decades. Such insulation can still be used, but continuous insulation installed over the studs, such as rigid foam, must also be applied.

In addition to enhancing a building’s energy efficiency, CI helps reduce moisture damage in the building envelope by lowering condensation within the envelope assembly resulting from vapor diffusion.


Why Continuous Insulation Really Matters

As a highly industrialized nation, the United States consumes energy in many areas including manufacturing, transportation, and construction.

According to the U.S. Green Building Council, “buildings account for approximately 40 percent of the total energy used today… and 38 percent of total carbon dioxide emissions in the United States,” which amounts to higher energy use than in the entire transportation industry. 

Obviously, the U.S. Department of Energy (DOE) realized that if they were truly going to make a difference in the environment, they had to tackle the biggest culprit — buildings. Specifically, thermal bridging.

If you’ve been around the construction and insulation industry you probably know the term. Thermal bridging, also known as cold bridges or heat bridges, are penetrations in a building’s insulation layer that allow heat (a.k.a. energy) to escape and cold to intrude during winter. Vice versa in the summer. In an airtight and insulated home, thermal bridges can account for heat loss of up to 30 percent. 

As more stringent legislation and energy awareness lead to increased insulation levels in walls, roofs, and floors, heat losses due to thermal bridging become increasingly important.  We discuss the topic of thermal bridges in depth here. 

[echo_cta]


Continuous Insulation In the Field

Perhaps the best way to understand how CI impacts high-performance home builders is via the following example by  GreenBuildingAdvisor.com: 

It’s been calculated that a 2×4 wall with R-13 insulation in the cavity actually has a whole-wall R-value of only R-11, and a 2×6 wall with R-20 insulation is actually performing at R-15.67. So… What happens when we add rigid insulation to the exterior?

Let’s take a 2×4 wood framed wall with R-13 fluffy stuff in the cavity and R-5 on the exterior to minimize thermal bridging and air infiltration. The combined R-value is R-17.26, while a 2×6 wall without external insulation measures R-15.67. So the 2×4 wall with continuous insulation actually performs better than the 2×6 wall without continuous insulation (CI).

This can save you money in construction as well as giving you more space inside. The exterior wall insulation can make it perform up to 50 percent better than the same wall without the rigid foam insulation.

Furthermore, studies done by the Oak Ridge National Laboratory (ORNL) found that thermal bridging through framing components reduces insulation performance by as much as 15-20 percent in wood frame construction and by 40-60 percent in metal framed buildings.

The installation of proper amounts of continuous insulation maximizes the full R-value of the insulation products. Continuous insulation on outbound exterior walls, alone are in tandem with interior insulation efforts, is the most efficient way of achieving improved R-values.

Rigid foam plastic sheathing materials are commonly used for continuous insulation because of their relatively high R-value per inch and low cost to meet or exceed energy code requirements. [We discuss the pros and cons of Rigid Foam Sheathing here and here.]

Other common continuous insulation solutions include:

  • Spray foam
  • Fiberglass boards
  • Fiberboard
  • Rock wool

How Tape Is Being Used with Continuous Insulation 

Improving the energy efficiency of all buildings will reduce the consumption of non-renewable fossil fuels, lessen dependence on foreign sources of that energy, and curtail greenhouse gas emissions. That’s all good, but what does this have to do with tape?

Related: compare our top insulation tapes

It is obvious to us that as customers demand more energy-efficient homes and building codes become more strict, adhesive technologies will play a major role in the application and effectiveness of ci.

Here are just a few ways builders and contractors can use tape more effectively in sealing the building envelope:

  • Tape all insulation seams to create an air/water-resistive barrier
  • Seal all penetrations with tape to create airtight seals
  • Create a continuous air/water barrier at the roof and foundation wall interface by taping all transition seams

In the long run, continuous insulation not only dramatically reduces building management costs, but the improvements in efficiency, help the building industry move closer to carbon neutrality and a more sustainable environment.


Customer Spotlight: Train2Build with Bill Robinson

Bill Robinson is a nationally known construction trainer and presenter and owner of Train2Build and Train2Rebuild, a company that provides education for the building industry and homeowners. Headquartered in New Orleans, Robinson hosts consulting and training programs that focus on detailing the building envelope in the hot/humid climate, best practices for installing doors and windows, flood hardy building materials and methods, and moisture management in the Gulf Coast region. 

And it just so happens that one of his favorite building materials is double-sided tape. Which makes Bill Robinson one of our favorite customers, obviously. 

How did you first learn about ECHOtape? Through blogging, actually. Amanda Voss reached out to me when she was researching a series of stories on moisture management and adhesive trends.

Customer Spotlight with Bill Robinson of Train2Build | ECHOtape.com

When did you start using our products? I had become fascinated with the powers of double-sided tape through my work with JLC, but ECHOtape was new to me. I reached out to Steve Underhill and he sent a couple of sample rolls for me to try and I was blown away. That was three or four years ago. I’ve been using ECHOtape ever since.

Using Double Sided Tape with Bill Robinson | ECHOtapeHow many different ECHOtape products have you worked with? Any favorites?  Although I have used your seaming tape, I’m mostly interested in double-sided tapes, using them in applications where I need to adhere to a substrate that I can’t typically drive nails through. Or even ones where you can, because I don’t like the idea of penetrations. Any hole, no matter how small, has the opportunity to become a problem when there is moisture involved. Double-sided tape allows me to have the same powerful hold, but with the added benefit of keeping things dry. For windows and doors, I am really impressed with the Double Sided Acrylic Foam tapes, UB-F3504 and UB-F3557.  And I’m a firm believer in seaming housewrap with tape, instead of fasteners or nails. Sure, it takes a bit more time, but the air sealing benefits are worth the extra effort.

What’s been the biggest surprise using tape in your construction projects? The surprise is the versatility. The reward is the adhesion level.  A nail is a nail; it has one job and does one thing. Caulk, which is something that I use often, is more versatile, but it’s still limited.  Tape is truly multi-purpose. The different adhesive components allow me to choose the best stick for the job. And it allows me to connect, or adhere to different substrates that were previously huge challenges, such as irregular surfaces. The cool thing is that I can weather strip without fasteners and ensure a moisture-resistant barrier.  

What has your customer experience been like? Phenomenal! My go-to guy is Steve Underhill. Mostly because I’m old school; I like talking through my challenges and you can’t do that with a chatbot.  Steve listens, he’s genuinely curious, and what he’s doing makes me look good. The results speak for themselves. 

[echo_cta]

What’s next for you and your business? Bottom line: I’m a building envelope guy that lives in the humid Gulf Coast of Louisiana. Moisture issues are what we’re trying to solve every day. Building homes to withstand hurricanes and tornadoes is important.  But the real challenge is moisture and microbial growth. 

Right now, I’m involved in a number of flood recovery and rebuilding projects, including the Disaster Justice Network in Lake Charles and lowernine.org in New Orleans. We’re creating training programs and resources — for builders and homeowners alike—to help these areas create durable, healthy, efficient, moisture-resistant homes, to better withstand the next weather event.  

As a consultant, I’m also on all kinds of Zoom meetings with building pros, the best of the best. But most of these guys are from the Northeast and Midwest, their concern is insulating houses for heating. In the humid South, we need to focus on air sealing a house for cooling and moisture. Those are two different things.  When it comes to hiring a company for a job, whether it’s an engineer, architect, or builder, make sure they know your climate challenges. If you don’t know, ask me. I’m an educator and a connector, I can find you to the right people. 


7 Ways to Use Double-Sided Tape in Construction Applications

Double-sided tape is any tape that is coated with adhesive on both sides. Designed to stick two surfaces together without being seen, these versatile tapes deliver neater-looking projects and better craftsmanship. And unlike screws or rivets – which join materials at a single point – high-strength double-sided tape permanently adheres one substrate to another while spreading the stress load.

Sounds great, right!?  Yet, much like everything else on the job site, choosing the right double-sided tape for the specific application is not as easy as it sounds.  Whether you’re bonding glass, wood, steel, concrete, foam, and/or plastic together, it’s important to understand the materials you are bonding. Concrete with a textured surface is going to require more adhesive strength than, say, carpet padding.


Best Uses for Double-Sided Tape in Construction

Outside of materials, it’s also important to understand the field conditions. A product that you used in spring or summer might not work in sub-zero winter.  Ice, rain, humidity, heat, UV, and dirt are all factors to consider when choosing the right tape or, more importantly, preventing tape failure. For more on this, check out our infographic, The Secret to Choosing the Right Tape.

That said, we are thrilled to see more and more tape being used in construction applications, especially since adhesive technology has come a long way.  As more and more builders start to focus on seaming the building envelope and getting improved HERS scores, tape is fast becoming a way to get the job done well.  Here are just some of the construction applications where double-sided tape plays a major role and we expect more and more in the future.

Overlap housewrap seams. Here’s the deal: single-sided tape used to seal housewrap may allow water to migrate behind the tape, and ultimately into the structure. Using a roller to bond the tape may help, but the better solution is to use double-sided tape as a housewrap tape so you can overlap seams and ensure no water gets through.

Overlap vapor barrier seams and attach them to cement walls in crawlspaces. More and more builders are putting vapor barriers down in crawlspaces to seam the building envelope as even in the basement there is air leakage.  You can also use a high-performance double-sided vapor barrier tape to attach the barrier to the walls instead of using screws.

Overlap any flooring underlayment including sound attenuation barriers. With more buildings becoming airtight, sound is becoming a big issue.  Use double-sided tape for any flooring underlayment including sound attenuation materials.

Permanently attach insulation to walls. Use double-sided insulation tape to attach insulation to the building and ensure it sticks.

Temporarily mount something prior to permanently fastening. Temporary double-sided tape is the perfect solution to hold something in place while you permanently mount it.  Examples include light switch junction boxes; electrical panels; electronic thermostats; baseboards; and crown moldings.

Floor protection. Often you need to cover floors or walkways with carpets or floorboards to protect the surface while construction is underway.  Our double-coated carpet tape features an aggressive adhesive system that’s perfect for carpet hold-down but will leave no residue once removed.

Easy installation of building materials. More and more manufacturers are making their products with double-sided tape for easy installation.  As labor shortage becomes a big issue, finding ways to save installation time is becoming critical.

For more information on double-coated adhesive tapes, please visit The Complete Technical Guide to Double-Sided Tape.  And if you still have questions, please contact us! We love solving unique tape challenges. 


Contractor’s Field Guide to House Wrap & Seaming

In this Field Guide to House Wrap & Seaming, we’ve gathered the most important installation and seaming tape tips to build quality, energy-efficient buildings.

We will cover building code best practices, how to install housewrap (the right way), how to prevent common house wrap problems, reasons why housewrap can still leak, and how seaming tape can make your building project airtight and moisture-proof.


House Wrap vs Vapor Barrier — What’s the Difference?

House wraps are installed to the outside surface of a home’s envelope, undersiding, or exterior cladding.

Housewraps must be permeable enough to allow water vapor to pass through them from the warm side, but still, stop bulk water like rain from entering on the cold side — similar to a Gore-Tex jacket.

Per Building America guidance, house wrap should be lapped shingle style over any exterior wall flashings installed around openings, penetrations, or where the walls intersect roofs, foundations, or other transitions. Any holes through the wall, such as for windows, water spigots, exhaust vent outlets, HVAC condensate lines, or light fixtures and receptacles, should be carefully sealed and flashed. It’s very important for any water vapor that makes it to the backside of an air barrier to keep moving so it gets to the air around the home.

Vapor barriers, on the other hand, are used to stop water vapor from entering a wall cavity, where the gas can turn into liquid water if it contacts a cold surface. If this happens and the water can’t evaporate quickly, wood rot, mold, and mildew become a reality.  A reality that is trapped on the inside of your wall.

No bueno.

The placement and permeability of vapor barriers and house wraps are addressed by building codes but vary by region. Vapor barriers are put on the inside face of wall studs in cold climates but they’re put on the exterior of homes in hot and humid climates.

The method? You want the vapor barrier as far away from the coolest wall surface as possible. In hot, humid climates, the cool side of the wall is the inside of the home, where the air conditioning is operating.

For an in-depth look at moisture in buildings, check out Building America’s moisture flow guide.

Related: read about the difference between air barriers and vapor barriers.


Why Does Perm Rate Matter?

Permeability (aka Perm rate) is the rate at which a house wrap allows water vapor to pass through it.

Inexpensive or poorly made house wraps often have perm ratings in the 8 to 12 range, and they should be avoided.

This is especially true for older homes in cold climates with little or no moisture barriers. Moisture will escape through the wall cavity and sheathing, and if the house wrap doesn’t allow it to pass through fast enough, it will condense and accumulate in the form of frost and ice. When the ice thaws, you’ll end up with wet sheathing and/or wall cavities—not good.

Instead, choose high-quality house wrap with a perm rating over 50.


Building Code is Best Practice for House Wrap Installation

Though many builders think of the IRC as the bare minimum requirement, when it comes to WRB installation the code is actually ‘best practice.’ It’s all in section R703 – Exterior Covering of the 2018 IRC.

R703.1.1 “The exterior wall envelope shall be designed and constructed in a manner that prevents the accumulation of water within the wall assembly by providing a water-resistant barrier behind the exterior cladding … and a means of draining to the exterior water that penetrates the exterior cladding.”

R703.2 addresses the Water-resistive barrier, giving builders and contractors two options for materials:  #15 lb tar paper meeting ASTM D226 requirements OR “other approved water-resistive barrier” (Meaning: approved by the local building official.) The manufacturers of house wraps and other WRB materials generally obtain an ICC Evaluation Service Report that code officials rely on when determining whether to accept an alternative material to #15 tar paper or not.

When “Other approved materials… are used as a WRB they shall be installed in accordance with the water-resistive barrier manufacturer’s installation instructions.” There it is — the manufacturer’s installation instructions are referenced in the code and are enforceable by the local official.

It’s critical to select the right house wrap for a home’s climate, from the dozens of varieties available; but even before that, you’ll need to find out if a house wrap is required for code compliance in your jurisdiction. Once you’ve determined if it’s necessary to meet code, you must be sure to install the product in strict adherence to manufacturer specifications so that it functions as intended.


How to Install House Wrap The Right Way with Seaming Tape

Contractors Guide to Housewrap and Seaming | via ECHOtape.comWhile manufacturer instructions for installing housewrap vary, generally there are three main tasks involved: wrapping, taping, and flashing. (Click here to watch an exterior house wrap installation, courtesy of the NAHB Research Center.)

Wrapping

Wrapping should start at the foundation, or the base of the wall assembly, extending at least an inch past the wall-to-foundation intersection and continuing upwards like shingle installation with the higher course overlapping the lower.

Horizontal seams should overlap at least 2 inches and vertical seams a minimum of 6 inches.

We found this post on avoiding a bad wrap to be helpful.

Taping

All of the seams for the product should be taped according to manufacturer’s instructions. Most house wrap manufacturer installation instructions have minimum horizontal overlaps of 4-6 inches and minimum vertical overlaps of 6 -12 inches.

Most also require or recommend 1 in. plastic or metal cap fasteners. The caps protect the house-wrap from damage during installation and spread the surface area of the fastener over a broader area of the WRB so the fastener is less likely to tear through.

Double-sided seaming tape that’s applied on one part of the wrap with another course overlapping (think shingle lap) helps prevents moisture — and meets code requirements.

Flashing

One of the most precise jobs when working with house wrap is properly installing the product around windows and doors. Flashing of exterior windows and doors is critical in casting rainwater away from those areas so that assemblies remain dry and durable.

Plus, wherever roofs meet walls, kick-out and step flashing must first be installed before continuing the housewrap shingle-fashion over the flashing pieces. Otherwise, the roof/wall intersection creates a place where water will be pushed into the wall, causing major structural damage.

Check out this Technotes piece from the Home Innovation Research Labs and the Internal Code Council.

Here are three of our favorite flashing tape tips:

  • Leave the outer release paper on until the flashing is stuck to the sill. That reduces the chances of the tape sticking to itself during installation.
  • Use a square block to push the tape tight into the corners, being careful not to puncture the corner.
  • Use a J-roller to push down the tape. Make sure to roll out any bumps and eliminate ‘fish mouth’ bubbles.

For more in-depth best practices watch this video from ProTradeCraft on proper house wrap installation.

The following are key takeaways:

  • Extend house wrap below the mud sill—for water management, but also for air sealing. Seal the bottom of the house wrap to the sheathing with caulk or tape.
  • Overlap the layers shingle-style as you go up the wall—like roofing shingles.
  • Overlap vertical seams 6-12 inches.
  • Overlap horizontal seams 6 inches (upper layer over lower layer).
  • Fasteners: use a cap nailer because slap staples leak.
  • Apply house wrap up the gables before installing exterior trim, even if the attic is not conditioned. House wrap is not just for air sealing the insulated parts of the house, it is mainly for water management. If the gable isn’t covered, water can get to the framing, and even behind the house wrap below.
  • Wrap and seal the underside of cantilevers. Better yet, add a solid sheet good to cover the bottom, and wrap over that.
  • Tape seams on flat house wrap with 2-inch tape; use 3-inch tape for wrinkled house wraps.

How To Prevent Common House Wrap Problems 

The performance of a high-quality, vapor-permeable, house wrap is dependent on proper installation, careful handling, and limited exposure to UV radiation and outside elements. The goal of house wrap is to create an air and moisture barrier that also prevents moisture accumulation in the wall system. Ultimately, house wrap should boost a home’s energy-efficiency and create a healthy, comfortable indoor environment.

Our friends over at Barricade, pulled together the most common house wrap issues. Here’s what you need to know:

Improper House Wrap Installation. Experienced and skilled house wrap installers avoid common problems with house wrap by following several key steps when installing house wrap.

  • House wrap is typically applied from the bottom of the building up, overlapping the horizontal joints by a minimum of six inches and the vertical joints by a minimum of twelve inches. Expand the house wrap over the footing top by a minimum of two inches.
  • The house wrap should be fixed every 12 to 18 inches with specific stapling nails or nails designed to hold down house wrap material.
  • Installation of house wrap around the window and door openings involves a Y-cut from corner to corner in the openings. Then, the loose material is folded through the openings and fastened securely.
  • Seal all seams with manufacturer recommended tape, including over the layers, the top and bottom edges, and the rough openings. It is also essential to seal the areas cut by subcontractors during the installation of the cladding.

Problems with House Wrap Due to Rough Handling. Rough handling or long exposures to wind and construction debris can tear, rip, and cut the house wrap. These damaged areas of the house wrap will allow air and moisture to enter the wall system. It is critical to seal and repair all damage to the house wrap due to rough handling and overexposure to wind and construction debris.

Damage Due to Overexposure to UV Radiation. Overexposure of house wrap to the sun’s ultraviolet (UV) rays can discolor and photo-degrade the house wrap. UV exposure can also cause the house wrap to lose tensile strength and water repellency. In some cases, this can happen quickly, depending on the house wrap’s ultraviolet (UV) rating. The UV-rating of a house wrap is the maximum time a house wrap can withstand exposure from the sun before becoming damaged.


10 Reasons Why House Wrap Can Still Leak

House wrap is an air barrier that creates an airtight structure by stopping air flow through a building’s envelope. But for a house wrap to stop air flow, it should be continuous over the entire building enclosure and be durable over the lifetime of the building. Unfortunately, there are several reasons a house wrap can leak after installation.

  1. Housewrap seams that are not sealed properly can cause air leaks. Sealing house wrap joints with the manufacturer’s approved seaming tape can improve the wrap’s performance by about 20 percent. Sealing the seams after installing the house wrap is essential to an airtight building.
  2. Using the wrong fasteners can cause air leaks. It is crucial for airtightness to use manufacturer’s stapling nails or nails designed to hold down house wrap material. Also, nails should be at least 1-inch long and spaced 12 to 18 inches on-center.
  3. Not repairing the tears, rips, or cuts in the house wrap that occur during installation can lead to air leaks. It is critical to seal the damaged house wrap with code-approved contractor sheathing tape before covering with siding. Repair of larger tears in house wrap requires a taped 6-inch overlap of house wrap.
  4. Not sealing the bottom edges of the house wrap can lead to air leaks.
  5. Air leaks can occur if the house wrap is cut to lie flat before installing siding, but not repaired.
  6. Air leaks can occur if the edges of the house wrap, cut at the rough windows and door, are not sealed. This error is common when installing utilities, pipes, cable tv, etc. For airtightness, wrap the fabric around the edges of windows and doors to the inside of the frame and seal with house wrap tape.
  7. Improper overlapping of roles of house wrap can cause air leakage. Overlap and seal vertical seams by at least 6 inches. Overlap and seal horizontal seams by at least 4 inches.
  8. Air leakage can occur if the house wrap does not reach the top of the wall. The house wrap should wrap up and over the top plate.
  9. If the house wrap is left exposed to excessive UV rays, the house wrap may deteriorate rapidly.
  10. If a house wrap is not resistant to cold, it may crack at low temperatures.

Maximizing the air barrier potential of house wrap requires the use of a quality house wrap, along with skilled house wrap installers. A quality house wrap should have high-tear and tensile strength, UV stability, cold resistance and ease of installation, which will limit damage and errors during construction.

House wrap and vapor barriers can get complicated. The movement of water, the possibility of drying, which side is warm or cool — these all factor into the success of a building’s envelope. However, getting the installation right is the final detail, ensuring that a well-chosen wrap or barrier actually performs as intended. Time spent making sure the details, like taping and flashing and placement, are all correct, means success in the long run.

After years of testing, and working with high-performance building professionals, ECHOtape has released its own seaming tape, PE-M4535 All Weather Construction Seaming Tape in addition to its All Weather Double-Sided Tape.  Formulated with a proprietary cold weather adhesive, it is engineered to adhere to a wide range of building materials and surfaces including house wrap, exterior, and rigid insulation, sheathing, vapor barriers, and a variety of underlayments.

If you’re a building contractor, ask us about a sample roll.


Why Seaming Tape Matters More Than Ever

In just about every climate in which we live and build, the No. 1 job of any building enclosure is environmental separation.

Keeping water, air, and heat locked in or out of buildings can make them more resource-efficient, durable, and safer for occupants.

The greatest challenge in this endeavor is maintaining the continuity of our air barriers, drainage planes, and insulation layers, particularly at penetrations, transitions, and margins of building assemblies.

The answer?

High-performance seaming tape.


Seaming Tape — A Brief History

In the early 1970s, residential builders knew almost nothing about airtightness and air movement. Even engineers were ignorant about hot and cold air leakage in buildings because the basic research hadn’t been done yet.

It wasn’t until the late ‘70s when the first residential air barriers were installed in Saskatchewan that pioneering Canadian builders began sealing the seams of interior polyethylene sheeting with Tremco acoustical sealant. (The first seaming tape, if you will.) The results were self-evident, and since then, most North American building codes now require builders to include details designed to reduce air leakage.

The same holds true in Europe, where using tape to seal the building envelope is the standard operating procedure in passive house (a.k.a. Passivhaus) construction. Passive Haus results in ultra-low energy buildings that require little energy for space heating or cooling.

In fact, tape experts cite Europe as the best example of the overall utilization of acrylic tapes in construction. “In Europe, they tape up everything when building or retrofitting to create an air-tight seal,” says David Joyce, nationally known construction and tape expert, and owner of Synergy Companies Construction LLC. “Energy costs are much higher there, and it’s a matter of necessity.” Joyce notes that the industry here in the U.S. “is just recently becoming more aware of the benefits of air-tight building practices and that acrylic tapes make that much easier.”

It’s easy to see why the practice of seaming is seeing a surge among insulation professionals: The energy benefits of air barriers are huge.

A 2005 study from the National Institute of Standards and Technology, “Investigation of the Impact of Commercial Building Envelope Airtightness on HVAC Energy Use” by Steven Emmerich and others, found that just incorporating an air barrier in a building can reduce its heating and cooling cost by up to 36%.

Furthermore, uncontrolled air leakage could have consequences beyond increased energy consumption, regarding health and safety of the building occupants, as well as premature deterioration of building materials.

Additionally, the International Energy Conservation Code (IECC) and several state energy codes now require the use of air barriers. In addition, a growing number of municipal authorities having jurisdiction (AHJs) and green-building trade groups are calling for their use. Some federal agencies and large owner and developer groups also require them.

More importantly, energy efficiency and occupant comfort—two key ingredients of sustainable design—are driving the use of air barriers across market sectors. With today’s high cost of energy and concerns about Indoor Environmental Quality (IEQ), air barriers are one of several construction systems with a critical role to play.

As our building profession evolves to becomes more energy-efficient, more sustainable, and more “green”, air sealing every building is going to become the norm. And, of course, more tape will be used to do this.

[echo_cta]


Benefits of Seaming Tape in High-Performance Building

There are three primary drivers for the increased usage of seaming tapes on job sites:

  1. More stringent codes. Increased building envelope requirements — air and moisture control layers;
  2. Improved tape technology.
  3. Heightened awareness of the high-value seaming tape by builders, contractors, and building scientists.

Don’t just take our word for it. Consider this direct quote from Building Energy Code Resource Guide

To limit air leakage, builders use tapes to seal the seams of a variety of membranes and buildings products, including housewrap, polyethylene, OSB, and plywood. Tapes are also used to seal duct seams, to seal leaks around penetrations through air barriers — for example, to seal around plumbing vents — and to seal sheet goods to a variety of materials, including concrete.

“Tapes have become much more commonplace in the construction industry today than they were 10 years ago,” Joyce says. “And they’re going to become more and more so as air sealing, energy efficiency and durability become more important, and builders are becoming more educated about the benefits of tapes over other sealants or flashing materials.”

Indeed, trend reports indicate that overall, tapes used on job-sites will outpace the overall construction industry growth (3%-5%) with an estimated 6%-7% annual growth rate. New residential tape use will increase the fastest in double digits due to code compliance. In the past, tapes were used sparingly on joists and viewed as a temporary fix or cheap solution.

Today, tapes have transitioned into high value and highly functional products that enhance building airtightness,  prevent water intrusion, and even increased roof safety and integrity in high wind events.

While no single tape works well in every air sealing application, there are four common benefits worth considering:  

  1. Seaming tape is very easy to use.
  2. In context to other building materials, tape is inexpensive.
  3. Effective air sealing — air control, moisture control, and “protection” of finished materials — depends on both the materials being used (what are you taping?) and what are the conditions (in heat, in cold, etc.). There are a lot of tapes available so you can match the conditions with the situation.
  4. Tape can create a continuous barrier when applied correctly, which is what you need an air seal to be for it to be effective. This is hard to get with other kinds of fastening systems.

Today’s newer and higher-performing adhesive tapes offer builders better choices and multiple advantages over conventional building materials. These tapes actually stick better over time, are more durable, and are more weather resistant. Indeed, modern adhesive technology is much more sophisticated as a whole.


The Next Generation of Seaming Tape

When it comes to choosing the best construction tape, the maxim that “if it ain’t broke, don’t fix it” doesn’t cut it. High-performance construction tapes will become more important as the construction industry deals with stricter regulations and as best practices in the industry change with the times.  To stay ahead of these changes, and meet the needs of high-performance builders across North America, we’ve recently launched a new seaming tape that uses advanced adhesive technology to stick to just about anything

PE-M4535 is a next-generation seaming tape for the construction professional looking for superior performance.  Formulated with a proprietary cold weather adhesive —excellent cold climate adhesion to -4°F! — PE-M4535 is engineered to adhere to a wide range of building materials and surfaces. Made from an advanced polyester backing, it is extremely strong, yet can still be torn by hand, which makes it easy to apply.

Highly adaptable and versatile, PE-M4535 can be used in a wide variety of building envelope sealing applications, such as:  

  • House wrap
  • Insulation, including polysio-cyanurate and reflective insulation
  • Exterior sheathing
  • Vapor barriers, including polyethylene films
  • Flooring and roofing underlayments

At ECHOtape, we’re focused on generating real-world adhesive solutions that help Building and Construction professionals work more efficiently and cost-effectively on every job site. It’s why we’ve engineered such an extensive line of durable, resilient, weather-resistant construction tapes, including seaming tape, insulation tape, foil tape, stucco tapes, cold weather tape and more. So, no matter what project comes your way, the quality and reliability of your work are guaranteed.

1.800.461.8273 | info@echotape.com | echotape.com