The Complete Technical Guide for Adhesive Tape

In this comprehensive guide to all things adhesive tape, we’re sharing 45 years of experience with you including:


Read on to find out why adhesive tape is quickly replacing glues and fasteners in manufacturing and construction, and how you can use it on your project today.


What is Adhesive Tape?

Adhesive tape (a.k.a. pressure sensitive tape, PSA tape, self-stick tape, or sticky tape) consists of a pressure-sensitive adhesive coated onto a backing material such as paper, plastic film, cloth, or metal foil.

Some tapes have removable release liners that protect the adhesive until the liner is removed. Some have layers of adhesives, primers, easy release materials, filaments, printing, etc. made for specific functions.

Pressure-sensitive adhesives (PSAs) do not require water, solvent, or heat activation to bond to materials such as paper, plastic, glass, wood, cement, and metal.

PSA tapes are tacky at room temperature in dry form, and they adhere firmly to a variety of surfaces and require only the application of a finger or hand. Technically speaking, that’s a bonding pressure of 14.5 – 29 psi =^ 10 – 20 N/cm² or greater.

Single-sided tapes allow bonding to a surface or joining of two adjacent or overlapping materials. Double-sided tape (adhesive on both sides) allows the joining of two items back-to-back.


A Brief History of Tape

The history of stickiness didn’t start with tape. It’s credited to the bees. Or rather, woodworkers in ancient Egypt used glue made from natural, viscous substances like beeswax and resin to hold materials together.

In modern times before tape, glues and epoxies did most of the sticky work. But they had serious drawbacks, especially in household use. Messiness, permanence, and drying to a hard finish all made traditional glues less-than-ideal.

It wasn’t until 1925 that adhesive tape, as we know it today, was invented.

According to How Stuff Works:

“Masking tape, as it became known, was intended to solve a very specific problem: applying two-toned paint jobs to cars. Before masking tape, auto shops were “masking off” for each color application using glue and paper. Peeling off the paper ruined countless paint jobs. Richard Drew, a young research assistant, witnessed one such ruined job and the furious cursing that followed. Drew, who had absolutely zero experience in adhesives, decided, apparently on the spot, to create an adhesive that could be removed from dry paint without peeling it off. Two years later, masking tape was introduced.”

Today, adhesive tape comes in all shapes and sizes, with varying degrees of stickiness, and for close to 45 years, ECHOtape has helped our customers match their specific application needs with the right pressure-sensitive tape.

And in that time, we have found that the majority of people have the same complaints and questions about tape. Here’s almost everything you need to know about adhesive tape as an industry professional.


How is Adhesive Tape Made?

We could tell you how adhesive tape is made, but this video by The Science Channel is much more fun:


As an aside, this video is also a great example of how tape is used in splicing. But that’s another topic for another time.


What Makes Tape Stick?

While the adhesive used on pressure-sensitive tapes might seem alike – they are all tacky, adhere well, and resist stresses – they are actually quite different. There are pros and cons for each tape type, be it rubber/resin, synthetic rubber, acrylic, and silicone-based adhesives.

Rubber/Resin is the oldest type of adhesive based on natural rubber, but it needs a resin to make it into an adhesive.

For many jobs, rubber/resin adhesives offer many advantages:

  • It is often a less expensive adhesive.
  • Has an initial high tack, as opposed to acrylic which needs time to cure.
  • Sticks well to many different surfaces, including some hard-to-stick-to materials.
  • Rubber-based adhesives provide highly flexible bonds and are usually based on butadiene-styrene, butyl, polyisobutylene or nitrile compounds.
  • It can be formulated to adhere at colder temperatures, but there is a limit, and rubber/resin adhesives have limitations at higher temperatures in its basic form.
  • Epoxy resins exhibit high strength and low shrinkage during curing and are known for their toughness and resistance to chemical and environmental damages.

When it comes to disadvantages, rubber/resin’s main weakness is that both the rubber and the resin are prone to oxidation from the air. Therefore, exposure to ultraviolet light from the sun and other light sources can break down in heat.

Synthetic Rubber can be used in place of natural rubber. Offering much higher adhesion and shear resistance than natural rubber-based adhesives; as a result, it is very good for sealing packages and cartons.

Acrylic Adhesives Most of the weaknesses of rubber/resin adhesives are overcome by a single component of pressure-sensitive adhesive based on “acrylic” chemistry. Acrylic is colorless and is stable to oxidation and exposure to ultraviolet light. The stability to oxidation can give an acrylic adhesive tape many years of protection against ultraviolet light. However, it is more expensive – about twice as much as rubber/resins;  it’s not quite so good as natural rubber on harder-to-adhere surfaces, and it needs significant time to cure.

Silicone-based Adhesives give many years of service life. Like acrylics, silicone can be used against the skin, so it has many medical applications as well as uses in the electrical industry where temperature is a challenge (e.g., jet engines). Silicone adhesives and sealants have a high degree of flexibility and are resistant to very high temperatures. However, silicones are the most expensive adhesives of all, typically twice as much as acrylics.

[echo_cta]


What are the Advantages of Pressure Sensitive Tape?

Traditional adhesives essentially transform from a liquid form into a solid one to adhere. Those processes are a function of the type of adhesive and how it is engineered to work and for what purpose. The interesting aspect of pressure-sensitive tapes is that they are “just liquid enough” to sufficiently wet the surface the tape contacts.

Conversely, these pressure-sensitive adhesives have enough of a solid-state character to resist any forces trying to remove it. As a result, pressure-sensitive adhesive tapes deliver the ideal means of fastening and offer the following significant advantages:

    • Other than ensuring that the surface is clean and dry, there is no preparation necessary.
    • Compared with trying to secure something with fasteners such as screws (which can cause various issues depending on the surface to which you need to attach) adhering something with tape can take seconds.
    • No special tools are needed, other than something to cut the tape (scissors or a tape dispenser). Many tapes can even be torn by hand.  Compared with fasteners such as screws, this is a much easier installation option.
    • It isn’t messy to use – there are no brushes or application tools and there is no surplus of adhesive or waste of materials.
    • Tape is extremely inexpensive compared to sealants, and provides an incredible number of uses per roll.
    • Tape can be applied as a die-cut to the exact area needed, further minimizing waste.
    • It is uniform in thickness, giving a precise bond.
    • It is instantaneous, which means no waiting for drying or chemical reaction.
    • The finished bond is stress-free. All other adhesives create stress in the joint when changing state, which can potentially weaken the bond.
    • It comes in many different varieties, some of which are tailor-made to very specific applications.

Why Tape Is Better Than Glue

On a job site full of tools and equipment, the right adhesive tapes can go further than a bucket of screws, for a lot less money. The versatility of adhesive tape makes it a practical substitute to replace traditional fasteners.

    • Overall, the most compelling case for using tape over glue is that there’s less mess, and tape takes less time to get the job done.
    • Available in a range of widths to suit multiple projects, adhesive tape is rated to support pounds per square inch while varying thicknesses and bonding properties combine to provide construction-strength adhesion for the unique challenges of dissimilar surfaces.

  • Many adhesive tapes feature a weather and UV-resistant stick for “tough to adhere to” surfaces like plastic, glass, and wood.

How To Choose the Right Tape  

We get this question a lot:  How do we actually know that it’s the right tape for the application and that it’s going to last? And that’s totally fair.

Almost everyone we know has a tape failure story, but tape isn’t the same as what you grew up with, or even what you used five years ago. Just as the cell phone in your pocket has gotten smaller, faster and smarter,  adhesive technology has gotten stronger and more versatile.

On a job site full of tools and specialty equipment, tape may seem as ubiquitous as a hammer and nails. However, nothing beats tape for versatility, portability, and ease of use… that is IF you have the right tape for the job at hand. And that’s the conundrum, isn’t it?  The sheer volume of pressure-sensitive adhesives is so overwhelming that it’s hard to know where to begin.

To help, we’ve created an infographic as a portable field guide for builders and contractors.  You can find it here:
A Field Guide to Choosing the Right Tape | via TAPED, the ECHOtape blog


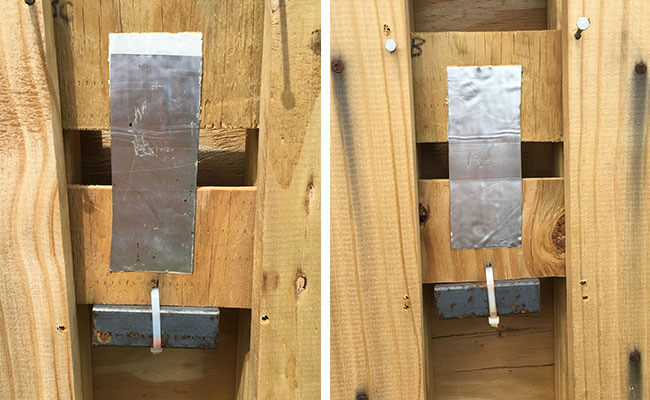
What Conditions Make Tape Fail? 

When it comes to tape, you may think you can’t believe everything you read. Upon review, a tape’s specification sheet can indicate that its adhesive properties are good, but when you use it, the resulting adhesion is poor.

Of course, when this happens, the tape tends to get the blame. But it isn’t always your tape for example that is at fault. In fact, it may be the surrounding conditions or even the surface that you are trying to stick the tape to.

If you’re facing this challenge, carefully consider every condition that could affect your tape. These can include several variables:

Temperature

Carefully factor in the temperature. Are both the tape and the surface at least 18ºC/65ºF? The tackiness of the adhesive tape is very temperature-dependent, and the colder the conditions, the poorer the bond will be. If you must work at lower temperatures, then use an adhesive tape specifically designed for colder climates.

Related: Why Tape Doesn’t Stick in the Cold

Surface: Is the surface clean? Traces of dust, dirt, grease, and even the slightest trace of moisture will contaminate the adhesive surface and act as a barrier between the two. To best prepare, the surface, give it a quick wash with rubbing alcohol and dry it with a clean cloth.

Uniformity

The typical adhesive tape has a very thin, flat smooth layer of adhesive. Is your surface also flat and smooth, so that the two can uniformly contact one another? If your surface is rough and full of micro “hills and valleys,” the tape can only make contact at the high points – which will result in a weak bond. With a moderately rough surface, you will need a tape with a much thicker adhesive that can fill these valleys, thus providing a major improvement in contact. If it is too rough, then you may need a foam tape with enough deformation to make a good bond.

Chemistry

Is the surface you are working with a plastic or other material? Is it covered with paint or another coating that has a naturally low adhesion or even release quality? Regular adhesive tape won’t stick to waxed surfaces, Teflon®, or silicone, and will even have difficulty sticking to polyethylene. A very tacky tape will help, as well as tapes with an adhesive that is based on natural rubber, but you may need to turn to an adhesive tape specifically designed for your specific surface.

As a very last resort, you may need to change the character of your surface to get an adhesive tape to stick to it. This could mean roughening it with an abrasive or even treating it with a prime coat that is compatible with both the surface and the adhesive.


How To Test Tape

When a customer comes to us with a challenge, we actually test the tape for them and with them.

There are two ways to do this:  Real-world field testing and lab testing. Ideally, we get to do both, like at The Durability Lab, but the bottom line is that the real world test matters most.

What good is a lab report when your building envelope leaks like a sieve, or your flying splice failed because the adhesive didn’t stick fast enough? Not good at all.

So here we’re going to walk you through the most common tape testing variables we use at ECHOtape.

Know Your Substrate

One of the most critical aspects of our application trials is to test the tape on the actual substrate which is where real-world applications come into play.

For years, lab tape testing was performed on standardized substrates, like steel, and it did not differentiate performance based on a specific material. Over the last five decades, we have learned how critical a factor this is. The tape may work on one specific substrate and fail on others. Sometimes the tape works on a substrate, but when any changes to the chemistry or condition of the substrate change, the tape could end up failing. Even a small change can have a major effect.

Take, for example, splicing tapes. In many situations, customers need a quick stick while materials are still moving (called a flying splice), but then the tape needs to permanently adhere for long-term performance.  We first test splicing tape by hand on the substrate — paper, cardboard, flexographic materials — and then see if it pulls fibers. This is good because this shows that the tape has a quick stick.  Then, we move it to the actual machine for real-world testing. A splice can take a blink of an eye and so you need to test the tape in the manufacturing process

Permanent or Temporary Bonding?

Which one you want makes a difference in how you test tape. Here are some more behind-the-scenes insights to our application testing process.

For temporary bonding, we are trying to discover whether tape adheres quickly and comes off cleanly..an important field test when considering protective film or stucco tape.  In this scenario, we will apply the same environmental conditions to the adhesives, and see how it performs. Does it apply quickly and evenly? Does it remove easily and without residue?  We can certainly duplicate this in the lab, but there’s no replacement for real world testing. Which is why it’s important that our clients understand that field tape testing takes time. If your issue is stucco tape isn’t sticking in 90°F and 100% humidity, it doesn’t do us any good to test it in the fall when it’s 60°F and 20% humidity.

Permanent bonding is a different animal.  Oftentimes, the tape needs to cure to assess performance, like acrylic adhesives that need 72 hours to set.  There are two common real-world tests we use here:

  • Shear strength. This is the force pulling down on the tape. To assess shear strength, we can hang a weight and see what happens. Does the tape slide? Where is the force trying to pull it apart? That is what you need to know when you test bonding.
  • Peel Strength.  Here we measure the degree of adhesion by lifting at 180-degrees, then lifting it the opposite direction. How well does it stick?  Does it delaminate, or rip off the substrate? If it delaminates, it means the tape is stronger than the substrate, something you look for when you need extreme bonding power.

Ultraviolet (UV) Exposure and Aging

UV light is a type of electromagnetic radiation, as are radio waves, infrared radiation, X-rays and gamma rays. It’s invisible to the human eye, but it makes a profound effect on adhesives. With prolonged exposure to ultraviolet light, certain chemical materials, such as natural and some synthetic rubbers as well as polyethylene, can experience negative changes to their properties; resulting in them becoming hard and brittle. Absolutely not the qualities you want in a tape that needs to hold for any duration in a particular application.  (Read our behind the scenes report on The Durability Lab here.)

The good news is that you can minimize the effects of UV light by choosing the right tape. For outdoor use, it is best to stay away from adhesive tapes with a natural or synthetic rubber adhesive. Unless the adhesive has been specially treated with ultraviolet stabilizers or the backing has an ultraviolet light barrier, like a premium outdoor stucco duct tape. There are also adhesive tapes that have been specially designed for prolonged outdoor exposure typically using an acrylic adhesive.

Extreme Temperatures

We are the leaders in cold weather tape for good reason: our home offices in Canada are ground zero for sub-freezing environmental conditions.

It doesn’t get any more real than that.

Still, we do also conduct lab testing. Using a temperature-controlled, environmental chamber, we bring temperatures down below -30°F and assess the outcome. Does it stick, and does it stay secure?  The same is true for heat, although real-world tape testing is done in Arizona, Florida, and Texas.


2017_CL-W6064_SpecSheet
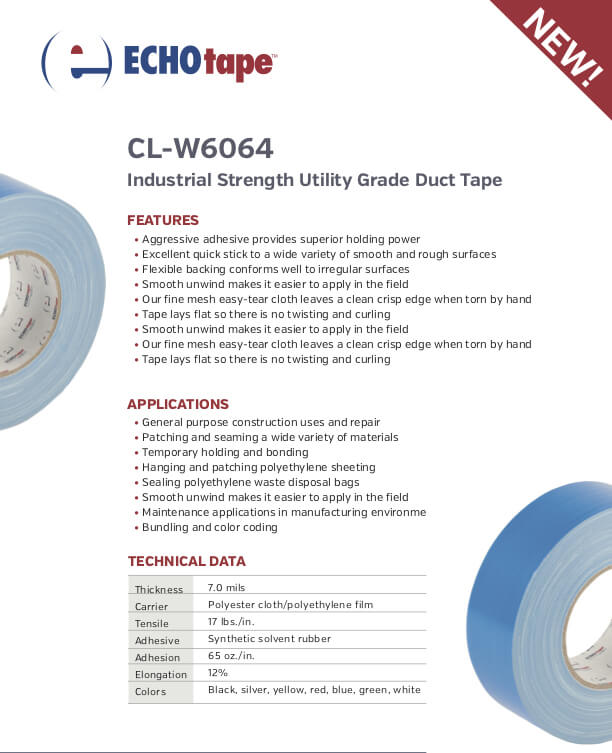
How To Understand An Adhesive Tape Spec Sheet

For engineers and general contractors, both the tape sample and the specification sheet should be closely reviewed when considering their uses. But what detail does the specification sheet provide and how can the maximum benefit be derived? Here’s what you need to look for, whether it’s high-bond foam tape, stucco tape or industrial-strength construction-grade duct tape:

    • Construction properties: The specification sheet will initially provide an accurate verbal description of the tape’s construction as well as a summary of its properties. By this information alone, you will know whether or not this is the kind of tape needed.
    • Versatility: Adhesive tape is highly versatile, and any individual tape can prove to have many other uses than were intended when it was first designed.  A pressure-sensitive tape consists of one or more soft amorphous broad molecular weight polymers and often contains several other chemicals. Because of this, even though it is manufactured to tight quality-control specifications, it can’t be manufactured to the precision expected of an accurately machined metal part.
    • Adhesive type: A natural rubber-based system is the general-purpose workhorse type of tape, but if you have special needs from your tape – such as long-term aging, resistance to ultraviolet light, or non-corrosive properties – you will need to look for the higher performance acrylic.  The adhesion level quoted is determined in a test environment (on a steel surface) in a very specific way, so your own end-use probably won’t duplicate this. But the specifications should serve as a helpful guide to what level of adhesion you can expect when compared to the adhesion quotes of other tapes.
    • Tensile strength and elongation information: The relationship between the tensile strength quoted and its elongation is far from linear, but you can get a rough estimate of the elongation expected when the typical slight application tensile force of less than a pound or two is applied to the tape.  With plastic films, this stretch will be elastic and the tape will want to recover, but with paper, it will be “dead stretch” with no recovery.
    • Temperature limits: Where the tape is intended for a higher temperature operation, the upper temperature limit will be quoted. Note however there is no tolerance with the upper working temperature, so the tape should not be used above this quote.

  • Resistance to shear: The resistance to shear (minimized effect of adhesive bleed or the “oozing” of adhesive beyond the tape) will also be given when it is key to good performance.

What is Adhesion Value, Exactly?

Tapes are often rated by adhesion value, which can be helpful if you know what it means.  Here are a few examples:

    • Looking for a removable tape? You definitely need low adhesion. A protective tape offers the lowest adhesion – at around 10 ounces per inch – while a masking tape would be around 25-35 ounces per inch.
    • A more difficult surface? You will need a higher adhesion level, perhaps even up to 45-60 ounces per inch. Additionally, if the tape is for a permanent application, it will usually call for a high adhesion value.
    • If the use is both permanent and on a porous surface, such as corrugated cardboard, then as long as the adhesive strength of the tape to the cardboard is higher than the internal strength of the cardboard (as evidenced by the tape tearing the surface of the cardboard), there is ample adhesion for the job – making adhesions of 60-100 ounces per inch totally unnecessary.

  • If the tape is for a rough surface, it means that the adhesive contact could be poor. So it may not be a high adhesion tape that is needed, but one with a thicker adhesive to better contact the surface. Similarly, a tackier tape might work better on a hard-to-adhere surface than one with a higher adhesion.

Tensile Force vs. Shear Force

When it comes to determining if a particular tape is right for your construction project, there are two forces to consider: tensile force and shear force.

Tensile force influences the elastic property of the adhesive. Specifically, it will first stretch the adhesive before finally pulling it away from the surface. If a tensile force causes a failure, it will most likely be in the adhesive at the surface. Therefore, adhesion testing that measures the elastic character of the adhesive, and how much force it can take, will help you select the right tape.

A shear force works parallel to the surface – it is the major force at work in double-sided tapes. Shear force resistance testing – often called “Holding Power” – is an effective way to measure the internal strength of the adhesive (known as “cohesion”).

Most adhesive failures or separation occur as a combination of both tensile and shear forces, it is extremely helpful to know what forces could potentially affect your tape.

Keep in mind that if the outside force is large enough, and is continuously applied, all tapes will eventually fail. It’s not a matter of “if,” but “when” – it may take an hour, a week, a year, or more, but if a tape isn’t designed to withstand the outside forces, it will eventually fail.


Release Liners: What Are They and Why Do You Need Them? 

For tape, because of how it is dispensed, the adhesive part must contact its own backing yet still be able to unwind easily. To achieve this, the backing must provide a low-adhesion release surface. In other words…not stick to itself!

  • Paper tapes need a coating known as backsize, as well as a low-surface energy coating known as a release coat. Plastic films only require a release coat.
  • The backing on foam tape won’t allow the adhesive to come in contact with it
  • For aluminum foil tapes, the act of unwinding it from its own backing will cause it to ripple and distort the foil, which will adversely affect the contact area as well as the appearance.


For all of the above, the best solution is to use a facing material with a low surface energy, usually a paper or a plastic film that has been treated with a silicone release coat. They could also be a polyethylene film that already has a low enough surface energy to work as release facing, or even a silicone-coated polyester film.


The Complete Technical Guide to Tape | via ECHOtape.com

Adhesive Tape is a Universal Tool

In short, pressure-sensitive adhesive tape is the industrialist’s dream come true. It is the universal tool that simply and conveniently solves many different fastening challenges. These tapes come in a wide variety of backings, each suitable for specific end-uses. This is exactly why adhesive tape use is on the rise in high-performance building and construction.  If you’re still using glues, sealants or even nails, consider pressure-sensitive tape.

Contact the ECHOtape team today to find the right tape for your application.

Related:


The Complete Technical Guide for Double Sided Tape

In this comprehensive guide to all things double-sided tape, we’re giving you all the information you need to know about choosing and using double-sided tape in seaming, splicing, bonding and beyond.


What is Double Sided Tape?

Created by applying a thin adhesive layer to each side of a carrier substrate material, double-sided tape, also known as double-coated tape or double-faced tape, is widely used by a vast array of industries for applications such as bonding, holding, mounting, splicing, and packaging. Obviously, it is most often used to stick two surfaces together; typically in a way not visible in the end product. This is due to it being installed “in-between” rather than “overlaying upon” in use.  This specific application allows for a neater look and better craftsmanship.

Double-sided tape can be either thin (such as paper-based) or thick (such as foam-based), coated with rubber, acrylic, or a modified version of these sometimes with differential properties. Double-sided tapes with thick bonding systems are usually better able to bond to unusual, non-uniform, or highly patterned and textured surfaces.  Thick bonding systems usually involve a foam carrier layer and may vary significantly in strength. Thin bonding systems are, as the name suggests, much thinner – sometimes so thin that they consist of nothing but pure adhesive on a silicone liner. And yes, much like everything else on a job site or at a manufacturing facility, choosing the right double sided tape for the specific application is paramount.

How is Double-Sided Tape Used?

Did you know that in auto manufacturing, double-sided tape has been replacing rivets and fasteners for years and is used to attach everything from dashboards to specialty car appliqués? Or that  RV and truck manufacturers use specialized double-coated tape to bond panels together and fasten exterior mirror glass to the mirror housing bezel? Here are just a few other applications where double-sided tape plays a major role:

House Wrap and Vapor Barrier Seaming. Use double-sided tape to overlap house wrap seams so water does not migrate behind it.  To reduce labor, use a high-performance double-sided tape to attach vapor barriers to walls in crawlspaces instead of using screws for a more air-tight seal. Learn more about this increasingly important process with our guide.

Acoustics and Sound. With more buildings becoming airtight, sound is becoming a big issue. Double-sided tape is often used in manufacturing to attach foam to wall panels or flooring underlayment to floors.

Graphic Arts & Signage. When it comes to bonding, double-coated tape is the go-to tool of choice for this industry.  Choose from a variety of adhesion levels based on what you need to stick together.

Convention or Expo Events.  Every exhibition hall that lays down temporary carpet uses a very special double-sided carpet tape which is removable after the trade show and leaves no residue. When securing and holding (think red carpet) carpets in place for major events or trade shows, it’s double-sided fabric tape to the rescue. These tapes typically feature a medium adhesion and tack, which allow for removal without residue.

Splicing and Tabbing.  For paper mills and paper corrugators, double-sided tapes are paramount to virtually every core-starting, splicing, or tabbing requirement.


What is Acrylic Foam Tape and Why Is It So Popular? 

Acrylic Foam Tape (a.k.a. ECHOtape’s Ultra Bond Tape) is comprised of a layer of foam core that is coated with acrylic adhesive on each side, and covered by a red liner.  It is stronger and will last longer, particularly in harsh conditions such as exposure to direct sunlight or extreme cold than most other tapes. Two key benefits of this adhesive tape are its strength and durability.

Indeed, acrylic foam tape has replaced screws, rivets, adhesives, and bolts in automotive, as well as other vehicles in transportation. Previously, manufacturers were forced to use metal fasteners, however, these had a number of drawbacks including the probability of rusting over time. As an alternative, this adhesive tape, which is water-tight/air-tight and rust-free, solves two problems with one solution.

The simplicity of the design is what makes acrylic foam tapes in general so easy to handle, but actually, each component —  core, adhesive, liner — is carefully selected and engineered to perform under a range of conditions.

Foam Core: Foam is at the core of the functionality; it helps distribute the load.  Available in a range of thicknesses and weights, it provides bonding between dissimilar, and uneven surfaces. Keep in mind:  The holding strength of the bond is determined by the surface area available for taping.

Adhesive: Here, it’s the acrylic adhesive that delivers strength and durability, allowing it to meet more demanding holding requirements.

Liner: Release liners are specifically engineered to provide an easy release from the adhesion of the acrylic foam tape itself. Our red liner exists to maintain the integrity of the “stickiness” while keeping the adhesive layer protected from environmental elements during shipment, storage, and use.

While acrylic foam tapes can perform a variety of functions, it isn’t the only double-sided tape on the market.  And it may not be the right tape for your job. Here’s how to find out:


4 Steps to Choosing the Right Double-Sided Tape

Double Sided Tape Basics | via ECHOtapeMost tape failures can be avoided by following one simple rule: Choose the right tape for the application. Sounds easy enough, but we find there’s a “one tape fits all” approach lurking on job sites and it’s wreaking havoc with your results.  Tape is a tool, just like a hammer, just like a saw. In fact, you wouldn’t choose a reciprocating saw for a project that calls for a circular saw, so why use duct tape when the project calls for outdoor double-sided tape?

Speaking of double-sided tape, there are many different options available on the market. Before you just reach for the first one you see, ask yourself these 3 questions first:

Step 1: What are the two surfaces you are bonding?

Choosing the right double-sided tape begins by evaluating the surface characteristics of the two substrates you’re trying to stick together. For example, the flatter and smoother the surfaces are, i.e. glass, aluminum, PVC, the thinner the tape can be. Conversely, the rougher the surface is, i.e. wood, cement, brick, stucco, the thicker the rough surface adhesive tape needs to be to provide adequate contact.

Step 2: What is your surface energy? 

All surfaces have a property known as surface energy, the degree of attraction or repulsion force of a material surface exerts on another material. Substrates with a high surface energy form very good surfaces for bonding, like glass, glazed tile, and bare metals. Plastics can vary from reasonably easy to very poor. For example, polypropylene and polyethylene are very hard to stick to and call for a higher adhesion and a very tacky adhesive.

Conversely, a material like silicone has such “low surface energy” that conventional adhesives won’t stick to it at all. Working with this material would, therefore, require an incredibly tacky and/or silicone adhesive.

It’s also important to take treated surfaces into consideration. For example, if a surface is coated with paint, the tape might stick well to the coating, but it there is a weak bond (low surface energy) underneath, the tape and the paint might peel off.

Step 3: What temperature resistance do you need?

Next, take your environment into consideration and choose a temperature-resistant tape. The tackiness of the adhesive tape is very temperature-dependent, and the colder the conditions, the poorer the bond will be. If you must work at lower temperatures, then use a double-sided tape specifically designed for colder climates.  The same holds true for extremely hot or wet conditions.

Humidity, dirt, and UV conditions all play a role. Choosing the correct temperature-resistant tape for the climate variables at hand is very important!

Step 4: What other conditions should I consider? 

When choosing the best double-faced tape for your project, it’s worth asking yourself these other key questions:

  • How long do you need the tape to hold?  Meaning, do you need a temporary or permanent solution?
  • If you need to remove the tape, do you need it to be clean removal?
  • What will the tape be exposed to while you are applying it, and afterward? Consider moisture, heat, cold, water, UV, and dirt.
  • Does the tape need to be a certain thickness for the application to work?
  • What width do you need?
  • Is there any heat involved in the application process, i.e. in manufacturing?
  • Are there any specifications you need or are required for the job at hand (i.e., EPA codes, UL approval, etc.)?

What it all boils down to is knowing these three things: your job, your materials, and your field conditions. Only then can you match the right adhesive with your project and decide if you need heat-resistant, extra wide, or specialty outdoor double-sided tape. By thinking about and answering these questions in regards to the adhesive, you can increase the longevity and success of your projects.

Take a look at ECHOtape’s double-sided tape solutions here.  And if you still have questions about double-sided tapes and how to leverage them on your next job, please contact us:  here at ECHOtape, we’ve made it our passion for more than 40 years to help professionals with their sticky issues!


Contractor’s Field Guide to The Building Envelope 

What is the Building Envelope and why does it matter? How can it fail? What role does tape play in air sealing?

In this post, we demystify the building envelope, helping builders and contractors identify weak spots in building tightness in order to improve air sealing, and create more structures that are sustainable, cost-effective and comfortable in all conditions.


What is a Building Envelope?

By nature, we do not expect our environment to maintain a consistent, 74-degree-Fahrenheit, 50% humidity, climate.

Our perception of comfort is quite adaptive and is based on circumstance, the expectation of environmental conditionals and activities.  We use umbrellas when it’s raining. We dress in layers when it’s cold. We use sunscreen when exposed to summer’s intense UV rays.

And yet, we expect our homes to provide thermal comfort and protection from the natural elements, at a consistent 74-degrees, every day.

Walls, roofs, windows, and doors all play a role, but really it’s the building envelope that makes this possible.

At its simplest definition, the building envelope is the exterior or shell of a building that repels the elements.

At its most complex definition, it’s an engineering system that meshes elements such as structural integrity, moisture control, temperature control, and air pressure boundaries into a single design strategy.

It is the physical separator between the conditioned and unconditioned environment of a building including the resistance to air, water, heat, light, and noise transfer. It’s the part of the house that you can draw a line around: the roof, the walls, and the foundation.  

While the building envelope is a silhouette of sorts, it’s important to remember that these are compounded layers. Each part of the building envelope must be thought of as a collection of smaller pieces working together to provide structural support.

The way the foundation and walls are built is essential in creating a sturdy structure, or a base, for the rest of the building. This is one of the main functions of construction because a well-constructed envelope is necessary to simply keep the structure standing.

The building’s design must be measured and carried out meticulously to ensure that there are no open edges, cracks between the windows and walls and imperfections between the roof and the walls, or between the walls and the foundation. It is all included within the building envelope concept.

That said, each part of the enclosure faces different challenges.

  • Roofs are bombarded by heat, rain, and hail
  • Walls contend with wind and rain
  • Foundations are always surrounded by wet, damp earth

On a construction level, the home’s building envelope is a series of composite layers —whether it be wood, glass, veneer, drywall, etc. — each with their own permeable properties that must be considered.

A proper building enclosure works together to achieve the same goals of stopping or slowing the flow of air, water, and heat while still allowing the inevitable intrusion of water as a way to dry out.


Why Do Building Envelopes Matter?

All told, building envelope components work together to perform four basic, but critical functions: structural support, moisture management, temperature regulation, and air flow.

The latter three—moisure, air and thermal—characterize the “control” functions of the building envelope, those facets that ensure a house is energy efficient, comfortable, and sustainable.

1. Moisture control. The most important element of the envelope’s control is its ability to regulate the transfer of moisture. Moisture presents a distinct danger to the overall integrity of a building and must be taken into account.

Moisture can and will impact your building over your head (roof), under your feet (basement/floor), and on your sides (walls). Each component must be addressed to prevent unwanted transfer from causing expensive damage. It’s essential in all climates, but cold climates and hot-humid climates are especially demanding.

2.  Air control. Controlling air flow is key to controlling energy consumption, ensuring indoor air quality, avoiding condensation, and providing comfort.

Control of air movement includes flow through the enclosure or through components of the building envelope itself, as well as into and out of the interior space. So, for example, when we talk of a house’s draftiness, we’re talking about the control of air flow.

3. Thermal control.  Thermal transfer brings to mind how comfortable we feel inside our own homes.

Is it too hot? Is it too cold? If you want to address this question, it is easiest to look up. As we learned in elementary school, heat rises, and if you don’t have enough resistance in the building to prevent heat from rising right through the roof, it is time to raise your building envelope IQ to prevent heat (and money) from escaping.


What is Building Tightness?

Building envelopes are often characterized as either “tight” or “loose.”

A loose building envelope allows more of a natural air transfer to occur, which improves indoor air quality which can remove the need for mechanical ventilation.

These types of building envelopes make the building more drafty and uncomfortable, it also makes the building harder to regulate temperature levels. This creates a higher chance of mold or mildew, and higher quantities of heated or cooled air are able to escape through leaks in the loose building envelope. This will increase energy bills along with negatively impacting the environment by releasing more greenhouse gases.

A tight building envelope allows for a high level of control over indoor air quality, temperature, humidity levels, and energy consumption.

This requires more insulation, caulk, adhesive tape, sealants, and energy-efficient windows to acquire a tight shell for the building. This leads to fewer drafts and a more comfortable building for its occupants, which often results in less waste in heating and cooling costs.

Tight envelopes also have a lower chance of producing mold or mildew from moisture infiltration, this can help prolong the life of the building components. The downside to a tighter building envelope is it requires more extensive mechanical ventilation systems because it limits how much natural ventilation can occur.

Additionally, good building envelopes which prevent drafts and other air leaks allow for tighter control of the air pressure inside as well as the temperature.

Without that, cooling and heating sources are constantly fighting the exterior elements that are making their way inside the building. Not only is this expensive, it makes being inside the building uncomfortable. For example, a home where the air conditioning system has been shut off all weekend would take longer to cool on Monday morning if the building design allows for leaks and drafts.

The tight envelope provides the ability to adequately control the quality of the air, making the interior of the building more comfortable and pleasant.


What are Best Practices for Building Envelope Systems?

We’ve said it before and we’ll say it again:  Build it tight; vent it right.

Without a virtually airtight, well-insulated building envelope, achieving the energy performance levels required for current IECC Building Codes and  California Title 24 is nearly impossible without a massive investment in renewable energy systems.

The good news for builders is that getting the building envelope right is one of the lower-cost, higher-return investments when designing for net-zero performance. It all boils down to good building practices.

According to ProBuilder.com, to make air sealing your top priority, concentrate on insulation.  Focus on sealing the areas along the top and bottom plates, particularly around the perimeter in the attic area and along the foundation, whether it’s a basement, crawlspace, or slab, so that you’re not getting convective loops in your walls.


Why Do Building Envelope Systems Fail?

When the building envelope system is designed and constructed properly, very few occupants pay attention. But when the building envelope fails (and even the best-built projects do in time), everyone notices.

Those failures can include aesthetic loss, corrosion, poor indoor air quality, energy inefficiencies, and, in some cases, life-threatening structural failure and eventual litigation—a builder’s worst nightmare.

1. Design deficiencies. Architects occasionally specify materials or design systems that are inappropriate for their intended use. Common mistakes include specifying materials that are incompatible with materials with which they come into contact or have inadequate performance criteria for thermal movement, structural capacity, or water penetration resistance.

Issues also arise when subcontractors try to reduce the weight, size, or amount of building envelope components (aluminum, glass, sealants, flashing, etc.) required on a project. This can lead to inadequate performance or capacity of the materials specified.

2. Material failure. It’s also common for properly specified materials to fail to meet the published performance levels. This could be a result of errors in the manufacturing, handling, or storing of the product or components within the product.

Common examples include degrading sealant adhesion, laminated glass delamination, and metal fatigue. While the anticipated performance levels are often based upon measured statistical performance, the strength of materials varies.

3. Poor workmanship. During construction booms, the problem of poor workmanship is exasperated as a result of having many inexperienced, unsupervised, and untrained personnel working on projects. It is common to find building envelope components not installed per the manufacturing specifications.

Word to the wise: Putting the right people in the right job goes a long way toward proper installation and overall profitability.

4. Acts of nature.
Even with flawless installations, bad things can happen to good work when environmental conditions exceed those that were anticipated during design. The effects of hurricane-force wind loads, driving rain, and extreme temperature fluctuations can overload a properly designed and constructed building envelope, causing damage to the system and making it vulnerable to further deterioration or failure.

While failures of this type cannot be stopped, many can be prevented through routine inspection and maintenance to identify small problems before they become big ones.


[echo_cta]

10 Reasons Contractors Should Use Tape to Seal the Building Envelope

As customers demand more energy-efficient homes and building energy codes become stricter, more and more contractors are using adhesive tape to seal the building envelope.

Today’s newer and higher-performing seaming tapes offer builders better choices and multiple advantages over conventional building materials.

These tapes actually stick better over time, are more durable and are more weather resistant. Indeed, modern adhesive technology is much more sophisticated as a whole.

But don’t just take our word for it.  Here are 10 great reasons to seal the building envelope with tape.

    1. No holes. Unlike nails or rivets, tape does not make holes. Fewer holes mean less opportunity for air leakage.
    2. Clean, easy application. Unlike liquid and foam sealants, adhesive tape is not messy and it’s easier to apply.
    3. It’s affordable. Using tape to seam is more affordable than spray foam or liquid adhesives.
    4. Versatility.  Unlike other construction materials, tape has a unique ability to withstand extreme temperatures, harsh environments and to bond securely with a host of different substrates and materials
    5. It’s energy efficient. Using tape to seal the building envelope is the standard in Europe where passive house (a.k.a. Passivhaus) is the norm. Passive Haus results in ultra-low energy buildings that require little energy for space heating or cooling. In fact, tape experts cite Europe as the best example of overall utilization of acrylic tapes in construction. “In Europe, they tape up everything when building or retrofitting to create an air-tight seal,” says David Joyce, nationally known construction and tape expert, and owner of Synergy Companies Construction LLC. “Energy costs are much higher there, and it’s a matter of necessity.”
    6. The Department of Energy recommends it. Direct quote from Building Energy Code Resource Guide: To limit air leakage, builders use tapes to seal the seams of a variety of membranes and buildings products, including housewrap, polyethylene, OSB, and plywood. Tapes are also used to seal duct seams, to seal leaks around penetrations through air barriers — for example, to seal around plumbing vents — and to seal sheet goods to a variety of materials, including concrete.
    7. The Green Building Advisor is obsessed with tape. Check out these articles: Backyard Tape Test and Air Sealing Tapes and Gaskets.
    8. Leaders in performance building, like Matt Rissinger, use it all of the time. Check out Tight House Construction and 4 Tips to Building an Efficient House, for example.
    9. And Hank Spies, who uses tape in metal roof sealing.  Quoted here:  The most effective approach is to seal all joints with butyl sealing tape…  It is more effective than caulk, and since the butyl does not cure, it tends to creep within joints to absorb the movement of the metal with changes in temperature. 
    10. Twice as nice. More and more builders are using double-sided tape as a housewrap tape so they can overlap seams and ensure no water gets through.

Clearly, the home’s building envelope is a critical concept to grasp. At ECHOtape, we’ve embraced the fact that a better building envelope leads to a healthier, more sustainable building.

We’re excited about the expanding role adhesive tape will play in building envelope design, or redesign, and our goal is to help builders and contractors find the weak spots in building tightness, improve air sealing, and create more structures that are sustainable, cost-effective and comfortable in all conditions.

Because a well-maintained and regularly observed building envelope doesn’t just save on energy bills; it will be better built to stand the test of time and mother nature.


Paper Mills – Pivoting to Meet Market Demands

If you thought the paper and pulp industry was going to disappear, think again. True, there has been a marked decline in traditional paper industries like newsprint. However, global trends are driving the need for new and innovative paper products, putting pressure on paper mills and corrugators to innovate and change.


4 Trends Driving Change In the Paper Industry

As a company that’s served the paper, pulp, and corrugate industries for four decades, we’re keenly aware of how the digital revolution has wreaked havoc on the market. And while there were substantial downturns in the late 1990s and early 2000s, paper mills are not disappearing—far from it.  We would argue that the industry is going through the most substantial transformation it has seen in many decades. Consider these four statistics as proof: 

  1. In 2020, the global production of pulp and paper reached 490 million tons, up from 390 million tons in 2018. 
  2. Global shipping volume surpassed 100 billion parcels in 2020, up from 74 billion parcels in 2017 according to Pitney Bowes.
  3. More than 15% of pulp and paper product sales in the United States will occur online, driven by higher demand for raw materials and corrugated boxes. 
  4. A goal of collecting and recycling 55% of all plastic packages has been set by the European Union and is expected to be reached by 2030. This will impact the pulp and paper industry, in a good way. North America and Asia do not have such governmental standards in place, however in the U.S. particularly, anti-plastic consumer sentiment is expected to drive legislative change.

How Paper Mills Will Pivot and Profit

While traditional markets like commercial print companies and newspapers have declined in recent years because of laser printing and online media, the opportunity for forest-products companies to innovate has never been greater. At ECHOtape, we see the following trends as opportunities for one of our core markets to pivot and profit. 

Recyclable Products. At the forefront of this trend is recycling. The movement to reduce waste from plastic packaging is being driven by changing consumer preferences and for good reason. The massive islands of plastic waste floating in the Pacific Ocean have garnered extensive media attention over the past few years, heightening consumer awareness about the excessive plastic pollution both on land and sea.  These preferences are spurring brand owners to replace plastic with renewable and recyclable alternatives and to address plastic in their sustainability goals.

As a result, the demand by consumers for more sustainable packaging is driving the need for more and better-recycled products. This has been a challenge in that some products contained coatings that were waterproof and problematic for recycling. Now there is a push to use protective coatings that are recyclable and it’s a trend that will further develop in 2020 and beyond. The growing concern over the amount of packaging that could not be recycled has resulted in the involvement of the European Union in the area of plastic packaging. In North America, seven states in the U.S. have plastic bag legislation, and several cities have banned plastic drinking straws. However, given the nature of the global marketplace, European policies may put pressure on the U.S. to do more.

Either way, this “anti-plastic” sentiment is beneficial to the pulp and paper industry in that it encourages biodegradable alternatives. Simply put, the problems associated with plastic result in a tremendous number of opportunities for paper mills. The development of alternative products will continue well into the next decade, especially as it relates to the banning of single-use plastic products.

Intelligent Packaging. It seems like just about everything is becoming a “smart” version of itself, so why not merge paper with new technology to create products that can do more than just wrap packages? This includes “smart packaging” containing built-in digital sensors. These products are grouped into two types: active packaging and intelligent packaging. Active packaging controls the environment of the product shipped, such as temperature. This could be important in shipping things like food products.

Digital “intelligent” packaging is becoming more important in two ways. First, more kinds of products are being shipped across the globe. Everything from cupcakes to fragile antiques. Being able to control the safe travel of these products and ensure their delivery is becoming more important. 

Numbers back this up. U.S. demand for intelligent packaging is expected to grow 8 percent annually. The market was forecast to top $3.5 billion in 2017. The two largest markets for this type of packaging are food and beverages, due to new online food ordering and delivery, and pharmaceuticals that are increasing in demand by aging baby boomers. 

The second way digital packaging is becoming more crucial is in overall safety. The threat of terrorism is a concern for government and corporation offices receiving packages daily. Having a digital way to identify contents and ensure safety, i.e. tamper-proof packaging, would be of high value. Also, consider money:  Embedding traceable chips within “smart” paper money raises the possibility of banks and governments guarding against counterfeiting and fraud.

[echo_cta]

Increased Corrugate Demand. Thanks to the explosion of eCommerce, there is a higher demand for raw materials and corrugated boxes, as well as an increase in the number of products that are required immediately with very little lead time.  There is also a shift toward more lightweight packaging at all levels, including luxury brands. One of the benefits of lightweight packaging is that it can support the growth of a business by cutting expenses. Lightweight packaging lowers pulp expenses, reduces CO2 emissions and slashes shipping costs, which are just some of the many benefits.

Hygiene Products Packaging. As the middle class grows in developing nations worldwide, so goes the demand for hygiene products such as toilet paper, wipes, tissues, and paper towels, to name a few. Manufacturers in the pulp and paper industry have exploited this growth in socioeconomic status by producing packaging that accommodates an increasing demand.

Advances in Food Packaging. Packaging for food seems to be in constant development. In recent years, there has been an increasing interest in packaging products that are resistant to grease, yet do not contain any fluorochemicals. Likewise, there is an increased interest in thermal packaging linked to the increase in food delivery services. Specifically, the explosion of third-party delivery service providers, such as GrubHub and UberEats, has created a need for thermal packaging.  As long as consumers expect to have hot food delivered to their home expeditiously, there will be a thriving thermal market in pulp and paper. There are many possibilities and opportunities in this area that will emerge as e-commerce continues to evolve.

Nanocellulose Disruption.  Completely new revenue streams are being developed by traditional paper mills through the extraction of nano-materials from cellulose fibers that can be used to enhance the performance of products unrelated to the paper industry such as paints, coatings, cosmetics, adhesives and video screens. That soft, comfortable rayon shirt or sweater is likely the result of a process that regenerates wood fiber called dissolving pulp into high-quality fabrics used throughout the textile industry.

As with any shifting industry trends and remarkable innovations, we’re paying close attention. Our tape is used in the production and converting processes of all kinds of paper. As the industry develops these new substrates and materials, they will be looking for new kinds of tape to get the coring, tabbing and splicing job done.  We’re ready to meet that challenge. 


Contractor’s Field Guide to House Wrap & Seaming

In this Field Guide to House Wrap & Seaming, we’ve gathered the most important installation and seaming tape tips to build quality, energy-efficient buildings.

We will cover building code best practices, how to install housewrap (the right way), how to prevent common house wrap problems, reasons why housewrap can still leak, and how seaming tape can make your building project airtight and moisture-proof.


House Wrap vs Vapor Barrier — What’s the Difference?

House wraps are installed to the outside surface of a home’s envelope, undersiding, or exterior cladding.

Housewraps must be permeable enough to allow water vapor to pass through them from the warm side, but still, stop bulk water like rain from entering on the cold side — similar to a Gore-Tex jacket.

Per Building America guidance, house wrap should be lapped shingle style over any exterior wall flashings installed around openings, penetrations, or where the walls intersect roofs, foundations, or other transitions. Any holes through the wall, such as for windows, water spigots, exhaust vent outlets, HVAC condensate lines, or light fixtures and receptacles, should be carefully sealed and flashed. It’s very important for any water vapor that makes it to the backside of an air barrier to keep moving so it gets to the air around the home.

Vapor barriers, on the other hand, are used to stop water vapor from entering a wall cavity, where the gas can turn into liquid water if it contacts a cold surface. If this happens and the water can’t evaporate quickly, wood rot, mold, and mildew become a reality.  A reality that is trapped on the inside of your wall.

No bueno.

The placement and permeability of vapor barriers and house wraps are addressed by building codes but vary by region. Vapor barriers are put on the inside face of wall studs in cold climates but they’re put on the exterior of homes in hot and humid climates.

The method? You want the vapor barrier as far away from the coolest wall surface as possible. In hot, humid climates, the cool side of the wall is the inside of the home, where the air conditioning is operating.

For an in-depth look at moisture in buildings, check out Building America’s moisture flow guide.

Related: read about the difference between air barriers and vapor barriers.


Why Does Perm Rate Matter?

Permeability (aka Perm rate) is the rate at which a house wrap allows water vapor to pass through it.

Inexpensive or poorly made house wraps often have perm ratings in the 8 to 12 range, and they should be avoided.

This is especially true for older homes in cold climates with little or no moisture barriers. Moisture will escape through the wall cavity and sheathing, and if the house wrap doesn’t allow it to pass through fast enough, it will condense and accumulate in the form of frost and ice. When the ice thaws, you’ll end up with wet sheathing and/or wall cavities—not good.

Instead, choose high-quality house wrap with a perm rating over 50.


Building Code is Best Practice for House Wrap Installation

Though many builders think of the IRC as the bare minimum requirement, when it comes to WRB installation the code is actually ‘best practice.’ It’s all in section R703 – Exterior Covering of the 2018 IRC.

R703.1.1 “The exterior wall envelope shall be designed and constructed in a manner that prevents the accumulation of water within the wall assembly by providing a water-resistant barrier behind the exterior cladding … and a means of draining to the exterior water that penetrates the exterior cladding.”

R703.2 addresses the Water-resistive barrier, giving builders and contractors two options for materials:  #15 lb tar paper meeting ASTM D226 requirements OR “other approved water-resistive barrier” (Meaning: approved by the local building official.) The manufacturers of house wraps and other WRB materials generally obtain an ICC Evaluation Service Report that code officials rely on when determining whether to accept an alternative material to #15 tar paper or not.

When “Other approved materials… are used as a WRB they shall be installed in accordance with the water-resistive barrier manufacturer’s installation instructions.” There it is — the manufacturer’s installation instructions are referenced in the code and are enforceable by the local official.

It’s critical to select the right house wrap for a home’s climate, from the dozens of varieties available; but even before that, you’ll need to find out if a house wrap is required for code compliance in your jurisdiction. Once you’ve determined if it’s necessary to meet code, you must be sure to install the product in strict adherence to manufacturer specifications so that it functions as intended.


How to Install House Wrap The Right Way with Seaming Tape

Contractors Guide to Housewrap and Seaming | via ECHOtape.comWhile manufacturer instructions for installing housewrap vary, generally there are three main tasks involved: wrapping, taping, and flashing. (Click here to watch an exterior house wrap installation, courtesy of the NAHB Research Center.)

Wrapping

Wrapping should start at the foundation, or the base of the wall assembly, extending at least an inch past the wall-to-foundation intersection and continuing upwards like shingle installation with the higher course overlapping the lower.

Horizontal seams should overlap at least 2 inches and vertical seams a minimum of 6 inches.

We found this post on avoiding a bad wrap to be helpful.

Taping

All of the seams for the product should be taped according to manufacturer’s instructions. Most house wrap manufacturer installation instructions have minimum horizontal overlaps of 4-6 inches and minimum vertical overlaps of 6 -12 inches.

Most also require or recommend 1 in. plastic or metal cap fasteners. The caps protect the house-wrap from damage during installation and spread the surface area of the fastener over a broader area of the WRB so the fastener is less likely to tear through.

Double-sided seaming tape that’s applied on one part of the wrap with another course overlapping (think shingle lap) helps prevents moisture — and meets code requirements.

Flashing

One of the most precise jobs when working with house wrap is properly installing the product around windows and doors. Flashing of exterior windows and doors is critical in casting rainwater away from those areas so that assemblies remain dry and durable.

Plus, wherever roofs meet walls, kick-out and step flashing must first be installed before continuing the housewrap shingle-fashion over the flashing pieces. Otherwise, the roof/wall intersection creates a place where water will be pushed into the wall, causing major structural damage.

Check out this Technotes piece from the Home Innovation Research Labs and the Internal Code Council.

Here are three of our favorite flashing tape tips:

  • Leave the outer release paper on until the flashing is stuck to the sill. That reduces the chances of the tape sticking to itself during installation.
  • Use a square block to push the tape tight into the corners, being careful not to puncture the corner.
  • Use a J-roller to push down the tape. Make sure to roll out any bumps and eliminate ‘fish mouth’ bubbles.

For more in-depth best practices watch this video from ProTradeCraft on proper house wrap installation.

The following are key takeaways:

  • Extend house wrap below the mud sill—for water management, but also for air sealing. Seal the bottom of the house wrap to the sheathing with caulk or tape.
  • Overlap the layers shingle-style as you go up the wall—like roofing shingles.
  • Overlap vertical seams 6-12 inches.
  • Overlap horizontal seams 6 inches (upper layer over lower layer).
  • Fasteners: use a cap nailer because slap staples leak.
  • Apply house wrap up the gables before installing exterior trim, even if the attic is not conditioned. House wrap is not just for air sealing the insulated parts of the house, it is mainly for water management. If the gable isn’t covered, water can get to the framing, and even behind the house wrap below.
  • Wrap and seal the underside of cantilevers. Better yet, add a solid sheet good to cover the bottom, and wrap over that.
  • Tape seams on flat house wrap with 2-inch tape; use 3-inch tape for wrinkled house wraps.

How To Prevent Common House Wrap Problems 

The performance of a high-quality, vapor-permeable, house wrap is dependent on proper installation, careful handling, and limited exposure to UV radiation and outside elements. The goal of house wrap is to create an air and moisture barrier that also prevents moisture accumulation in the wall system. Ultimately, house wrap should boost a home’s energy-efficiency and create a healthy, comfortable indoor environment.

Our friends over at Barricade, pulled together the most common house wrap issues. Here’s what you need to know:

Improper House Wrap Installation. Experienced and skilled house wrap installers avoid common problems with house wrap by following several key steps when installing house wrap.

  • House wrap is typically applied from the bottom of the building up, overlapping the horizontal joints by a minimum of six inches and the vertical joints by a minimum of twelve inches. Expand the house wrap over the footing top by a minimum of two inches.
  • The house wrap should be fixed every 12 to 18 inches with specific stapling nails or nails designed to hold down house wrap material.
  • Installation of house wrap around the window and door openings involves a Y-cut from corner to corner in the openings. Then, the loose material is folded through the openings and fastened securely.
  • Seal all seams with manufacturer recommended tape, including over the layers, the top and bottom edges, and the rough openings. It is also essential to seal the areas cut by subcontractors during the installation of the cladding.

Problems with House Wrap Due to Rough Handling. Rough handling or long exposures to wind and construction debris can tear, rip, and cut the house wrap. These damaged areas of the house wrap will allow air and moisture to enter the wall system. It is critical to seal and repair all damage to the house wrap due to rough handling and overexposure to wind and construction debris.

Damage Due to Overexposure to UV Radiation. Overexposure of house wrap to the sun’s ultraviolet (UV) rays can discolor and photo-degrade the house wrap. UV exposure can also cause the house wrap to lose tensile strength and water repellency. In some cases, this can happen quickly, depending on the house wrap’s ultraviolet (UV) rating. The UV-rating of a house wrap is the maximum time a house wrap can withstand exposure from the sun before becoming damaged.


10 Reasons Why House Wrap Can Still Leak

House wrap is an air barrier that creates an airtight structure by stopping air flow through a building’s envelope. But for a house wrap to stop air flow, it should be continuous over the entire building enclosure and be durable over the lifetime of the building. Unfortunately, there are several reasons a house wrap can leak after installation.

  1. Housewrap seams that are not sealed properly can cause air leaks. Sealing house wrap joints with the manufacturer’s approved seaming tape can improve the wrap’s performance by about 20 percent. Sealing the seams after installing the house wrap is essential to an airtight building.
  2. Using the wrong fasteners can cause air leaks. It is crucial for airtightness to use manufacturer’s stapling nails or nails designed to hold down house wrap material. Also, nails should be at least 1-inch long and spaced 12 to 18 inches on-center.
  3. Not repairing the tears, rips, or cuts in the house wrap that occur during installation can lead to air leaks. It is critical to seal the damaged house wrap with code-approved contractor sheathing tape before covering with siding. Repair of larger tears in house wrap requires a taped 6-inch overlap of house wrap.
  4. Not sealing the bottom edges of the house wrap can lead to air leaks.
  5. Air leaks can occur if the house wrap is cut to lie flat before installing siding, but not repaired.
  6. Air leaks can occur if the edges of the house wrap, cut at the rough windows and door, are not sealed. This error is common when installing utilities, pipes, cable tv, etc. For airtightness, wrap the fabric around the edges of windows and doors to the inside of the frame and seal with house wrap tape.
  7. Improper overlapping of roles of house wrap can cause air leakage. Overlap and seal vertical seams by at least 6 inches. Overlap and seal horizontal seams by at least 4 inches.
  8. Air leakage can occur if the house wrap does not reach the top of the wall. The house wrap should wrap up and over the top plate.
  9. If the house wrap is left exposed to excessive UV rays, the house wrap may deteriorate rapidly.
  10. If a house wrap is not resistant to cold, it may crack at low temperatures.

Maximizing the air barrier potential of house wrap requires the use of a quality house wrap, along with skilled house wrap installers. A quality house wrap should have high-tear and tensile strength, UV stability, cold resistance and ease of installation, which will limit damage and errors during construction.

House wrap and vapor barriers can get complicated. The movement of water, the possibility of drying, which side is warm or cool — these all factor into the success of a building’s envelope. However, getting the installation right is the final detail, ensuring that a well-chosen wrap or barrier actually performs as intended. Time spent making sure the details, like taping and flashing and placement, are all correct, means success in the long run.

After years of testing, and working with high-performance building professionals, ECHOtape has released its own seaming tape, PE-M4535 All Weather Construction Seaming Tape in addition to its All Weather Double-Sided Tape.  Formulated with a proprietary cold weather adhesive, it is engineered to adhere to a wide range of building materials and surfaces including house wrap, exterior, and rigid insulation, sheathing, vapor barriers, and a variety of underlayments.

If you’re a building contractor, ask us about a sample roll.


Why Doesn’t Adhesive Tape Stick in the Cold?

Why doesn’t your adhesive tape stick in the cold weather? Why does it becomes dry, brittle, and offers little-to-no tack? Why does it lift and peel within days?

To fully understand the reason why adhesive tape doesn’t stick in the cold requires consideration of the variety of different types of adhesives available and the way they are created. Some are applied as a liquid and then they transform into a solid. Depending on their function, they are engineered accordingly.


What Exactly Happens to Tape in the Cold?

What makes adhesive tape different from other adhesives is that they have the properties of both a liquid and a solid. The liquid component is needed to provide the “wetness” (tack or stickiness) for good initial contact, and the solid component is critical to resist any forces (AKA sheer strength) that could threaten to remove the application.

Yet when cold temperatures occur, the liquid component of the adhesive tape hardens, similar to what happens to butter in the refrigerator. The tape loses its natural form and its overall tackiness. It can therefore no longer make the adequate contact needed for good adhesion. If the temperatures continue to drop, the tape will eventually freeze, turning the liquid component into a tack-free solid.

[echo_cta]


When Does Tape Freeze in the Cold?

So at what temperature does this happen? It depends on the type and design of the adhesive. Typical adhesuve tapes will freeze long before the freezing temperature of water is reached; while other specially designed tapes will continue to stick below freezing temperatures.

When the tape won’t stick because it’s too cold, you have two options:

  • Increase the temperature of the tape and the surface the tape is applied to; ideally to around 20 degrees Celsius.
  • Get a tape that is specifically engineered and designed to work in cold weather

Bottom line is that when you are working on a tape application in cold weather, you will need a cold-weather tape that’s right for the job. Not all tapes are designed to work in this type of weather.  ECHOtape’s global head office is in Canada, so we have been attuned to this issue since the inception of the company.   Look to us when you need a cold-weather tape that can work!

For more information about tape visit The Complete Technical Guide to Adhesive Tape.  or contact us with any questions you may have about your cold weather tape requirements.


Top 50 Resources for Contractors & Builders

No matter where you live in the US or Canada, it’s always building season.

Which means that building pros don’t have the time to search the web for construction news, building trends, building code updates, and inspiration. Which is why we did the work for you.

We’ve compiled 50 of the best online resources for contractors and buildings, covering everything from green building news to sustainable design to metal building. We also list the best podcasts for general contractors, so you can soak in the news while you’re on the move.

Without further ado, here are 50 of the best influencers, podcasts, online links and resources for contractors, builders, stucco professionals and more.


Start Here: Top Online Resources for High-Performance Building Pros

This are the go-to resources for everything construction related. The following sites have videos and informative articles that cover a wide range of topics relevant to contractors.

  1. Matt Risinger. This Austin-based builder explores the principles of building science, discusses best practices in building and remodeling and features product reviews all on his amazing YouTube Channel, Build with Matt Risinger.
  2. Construction Instruction. We discovered this gem at the IBS Trade Show in Orlando… and all we can say is, how did we ever live without it? P.S. It’s not just a YouTube Channel, it’s also an app.
  3. Corbett Lunsford. For home performance professional and homeowners alike. We especially love the awesome and weird things Corbett and his wife, Grace, share from their field work as building forensics experts. And, as if that weren’t enough, tune into the Building Performance Podcast for more hands-on insight from Corbett.
  4. The High-Performance Building Exchange. Information and insights from building industry experts. Simply amazing content.
  5. Journal of Light Construction. An awesome compilation of videos from the industries top pros. Plus, we can’t live without their weekly newsletter, delivered on Sundays.

Stucco Specific Resources

Do you make your living from stucco and plaster? The following stucco specific resources will keep you up-to-date.

  1. Giordano Plastering. If plastering and stucco is your game, don’t miss Kirk and Jason Giordano’s 700+ video treasure chest covering everything you could ever want to know about plastering.
  2. The Stucco Guy (a.k.a. Ryan) made it his mission to educate people about every aspect of stucco, including materials, the different systems, stucco application techniques, and everything in between. It is the single most comprehensive website on the subject of stucco that we’ve found.
  3. The American Society of Home Inspectors is is a great resource for virtually all builders and contractors, but we bookmarked this particular stucco post, written by ASHI Past President David Tamny, for its unique perspective.
  4. Stucco Manufacturers Association. If stucco is your trade, this is a must-belong membership site. Much of the information is membership-protected, but this FAQ is a great resource for builders needing info on the fly.
  5. Sometimes the best place to get answers is from other contractors. ContractorTalk is a free online forum for contractors from all fields, including stucco. Can’t find an answer to your question? Post a question and you’re sure to get an answer from a pro.

Construction Trends

Keeping up with construction trends is a full-time job in itself. But this site cover construction trends so thoroughly that you will never have to go searching the web again.

  1. Construction Dive. The site is a treasure chest of valuable info, but the CD Daily Newsletter is one of our favorite morning reads. It delivers a bird’s eye view of the construction industry in 60 seconds or less.
  2. The Construction Specifier is the official magazine of the Construction Specifications Institute (CSI),  the only peer-reviewed U.S. publication targeted to those construction profs who select, recommend and influence buying decisions.
  3. Buildings of the Future: It’s Time to Rethink the Bottom Line” addresses the evolution of the construction industry, and how ROI is, or will be, calculated. FYI:  We’re including this link for the downloadable white paper on the subject at the end of the blog. You are going to have to give up your email address to read it, but it’s worth it.
  4. How do we in the construction industry balance the challenges of achieving building performance while balancing other variables including budget, project milestones, and an extensive project team?  The Living Building Challenge at Georgia Tech is working to answer that. A must read.
  5. It takes great teams to build great projects. That’s the impetus behind Building Design + Construction Network and it’s the only resource we’ve found that unified the architect, engineer, contractor audience with the owner/developer. Great content.

Building Codes & Practices

Don’t get caught violating building codes or failing to know best practices because you’re out of the loop. Check out these building code resources so you don’t get left following out-of-date practices.

  1. Building Science Podcast.  70 episodes and counting, and we can’t get it enough. Presented by Positive Energy, an engineering firm in Austin, the hosts are at the forefront of building technology, but also have a love of conservation and keeping things simple.
  2. Avoiding Wet Walls.  JLC’s Sunday Update is one of our favorite email newsletters. But it’s this article that ever contractor shoud bookmark.  It talks about how important CI has become in the fight against condensation and water penetration, so much so that it’s now part of the energy codes in specific climate zones.
  3.  The American Society of Home Inspectors’s (ASHI) Standards of Practice—covering all of a home’s major systems—are now part of many pieces of state legislation and are recognized by consumers as the authoritative standard for professional home inspection.
  4. Legal Ease. Ever wonder what a lawyer would think about your building project? Quality Built knows. The lessons learned from analyzing more than 2,000 litigation cases and investigations have formed the basis of the site’s ever-growing knowledge database – which is used to evaluate builder quality and minimize construction defects.
  5. Bookmark this:  Energycodes.gov. You can find the current status of energy code adoption for each state here, with detailed information on each state’s status.
  6. And this: Code Watcher.us.  Conceived and produced by expert staff with decades of code knowledge and experience, here’s a “clearinghouse” for all things code-related.
  7. And this:  BCDNetwork. Another great resource on current energy codes, along with trends, proposed changes and case studies.
  8. The Institute for Market Transformation did a two-part series on “What To Expect from the 2015 IECC” here and here. This organization’s mission is “promoting energy efficiency in buildings” and consistently publishes from this standpoint.
  9. The National Association of Home Builders has also compiled a list of what they consider to be “Critical 2015 Code Change Proposals” and the outcome of each proposal.
  10. With a comprehensive circulation of 110,000 new-home builders and their subcontractors, BuilderOnline.com provides balanced, analytical coverage of the economy, housing policy, building codes, design, construction, new products, sales and marketing, technology, and business management.

Best Online Resources for Building Professionals | via ECHOtape


Resilient & Sustainable Design

  1. Curious about resilient design? Start here: The Resilient Design Institute. It’s ground zero for practical solutions that can be employed by communities, businesses, and individuals to adapt and thrive amid the accelerating social, ecological, and climatological change being experienced today.
  2. We talk a lot about building resilience on the blog, a subject that’s obviously moved to the forefront of daily conversation. This article from Building Design and Construction talks about relocation efforts after major disasters, where this has already happened and the hurdles that Homeowners have to deal with.
  3. US Climate Resilience Toolkit. This is probably one of the best “one-stop shop” resources for resilient design and supporting documentation for issues related to climate change. A great resource for architects and builders to use and share with clients and developers.
  4. National Institute of Building Sciences has a whole section of their website dedicated to Building Resilience Resources.
  5. Although specifically targeted at addressing typhoons and earthquakes, the information within The United Nations Economic and Social Commission for Asia and Pacific’s Resilient Construction and Design Guide can easily be applied for buildings on the east coast, which are prone to some seismic and hurricane hazards.
  6. The World Bank’s Sustainable Cities blog presents a fascinating look at resiliency on a global scale. Start here.
  7. Whole Building Design. This free resource is a gateway to up-to-date information on integrated ‘whole building’high-performance design techniques and technologies.

Green Building

white concrete building near a swimming pool

  1. Does Green Building Pay?  Yes. At least according to a new study from The University of Texas at Austin and the U.S. Green Building Council (USGBC) found that new homes built to meet green building standards like LEED), are worth an average of $25,000 more in resale value than conventional homes.
  2. Thermal Insulation Growth. Last year, the Building Thermal Insulation Market was valued over $25 billion, and it’s slated to surpass $34.9 billion by 2024. The article and report provide great insight on what to expect on thermal building insulation in the next several years when it comes to the different types of insulations. To get a full report, simply request a sample here.
  3. It’s no secret that zero energy ready homes are the future of building. But this article by Green Building Advisor dives deep into a San Joaquin County Habitat for Humanity project that cost less to build — not to mention less to own — than any of their previous standard energy-efficient Habitat homes.
  4. Go For Solar. Last year, South Miami passed a building code that required a solar panel on new residential construction. This is the first solar requirement of it’s kind outside of California and one that we are paying close attention to.
  5. Green Building Continues to Rise. To date, almost 130,000 homes have earned NGBS Green certification and almost 97,000 homes have been registered to earn NGBS Green certification. Home Innovation Research Labs is paying close attention.
  6. Green Building Advisor.  A single resource where design and construction professionals and knowledgeable homeowners can get the full complement of the information — proven construction details, in-depth how-to advice, a green-products database, green business strategies, design tools, and alternate paths to code compliance together in one place.
  7. EcoBuildingPulse, powered by EcoHome and Eco-Structure, provides the news, products, and best practices for green-building professionals focused on best practices and innovative new developments from the industry’s thought leaders.

Metal Building

  1. Metal Construction News is your one-stop shop for all things metal building news, products and strategies driving this sector.
  2. Metal Building Insulation.  This is a great technical overview of continuous Insulation for the Metal Building industry. Emphasis on technical.
  3. Metal Building Insulation Trends. Not one, but two great articles by Ceco Building Systems on metal building insulation and energy codes. Part 1 dives into energy codes. Part 2 examines code-compliant, cost-effective metal building design.
  4. Metal Walls. Metal Roofing. Metal Buildings. Sustainability. DesignandBuildwithMetal.com won’t win any web design awards, but it’s crammed full of up-to-date information on all things metal building.
  5. Every year, Metal Construction News asks industry experts to present their ideas on where the industry will go in the next few years. Here’s the 2018 State of the Industry Report.

Listen Up! Best Podcasts for Contractors

    1. Building Performance Podcast.  Hosted by Corbett Lunsford of the Building Performance Workshop, this podcast is for contractors, from contractors. The Building Performance Podcast is an interview series that draws on the experience and ideas of high-performance building pros around the world. Think engineers, policymakers, contractors, diagnosticians, architects, and building managers, among others.
    2. ConTechCrew. If you haven’t had a chance to listen to this show yet, check it out! Rob McKinney (@conappguru), James Benham (@JamesMBenham), Josh Bone, and Jeff Sample discuss the latest construction news and are typically joined by a heavy hitter in the construction tech world.
    3. Constructrr.  Construction manager and consultant Brittanie Campbell-Turner (@Brittanie_ct) launched this podcast last year to examine the evolving nature of construction. She often highlights individuals who are finding new ways to make the industry more efficient and collaborative.
    4. Protractor Podcast. Do you ever wish you could talk to other successful contractors who are in the trenches just like you? Or even just listen to them as they share the stories, failures, and secrets they have learned over the years? Well… that’s the Protractor Podcast in a nutshell, delivering the latest Inspiration, Motivation, and Education to grow your business with purpose.
    5. Contracting Coachcast. The Contracting Coachcast is a daily 15-minute podcast hosted by Tony Booth (@anthonybooth). With over 170 episodes under its belt, this podcast has covered a large array of topics, including budgets, recruiting, leadership, and more. This is an especially helpful resource for construction startups and regional construction business owners.

1.800.461.8273 | info@echotape.com | echotape.com