What’s the No. 1 reason why contractors love to use adhesive tape on the job site? Because it sticks in almost any condition. That, of course, is the same reason why we loathe it when it won’t come off. Heavy duty construction adhesives and their sticky, gooey tape residue can be a real challenge to remove from surfaces.
Why does this happen, and what can you do about it? Our site did a great job explaining why residue occurs, but what you really want to know is… how can you remove tape residue without damaging the underlying material, right?!
10 Simple Solutions to Remove Tape Residue
- Test first! Please test your residue remover in an unnoticeable area first to make sure there will be no damage to the surface. This is especially true for wood, painted surfaces and any high gloss finished surface as the agents in some removers can dull the surface and or discolor them!
- Make it quick. Think of tape like a band-aid. Removing it slowly allows flow and separation, creating more stickiness (and pain!), while ripping it off in one motion makes for a clean, less painful removal. This is not necessarily true for all surfaces; this is an ideal technique for tape that has been on for a few days while the tape is still tacky, but if the tape has dried out take a little more time to take it off not to damage the surfaces as the surface may also be affected if the tape has been on too long especially painted walls.
- Scrape it. To remove small amounts of construction adhesives from your paneling, molding, and floor, use a putty knife to scrape the adhesive off. Just be careful not to drive the edge of the knife too hard on the surface to avoid causing damage. (For stone or mirrored scratch-resistant surfaces, consider using a straight blade to scrape residue away.)
- Try warm, soapy water. For surfaces such as acrylic, plaster, asphalt, copper, enamel, glass, linoleum, marble, pewter, plexiglass, and all things vinyl, all you need is warm, sudsy water. The warm water will soften the tape so it can be removed with a sponge or cloth.
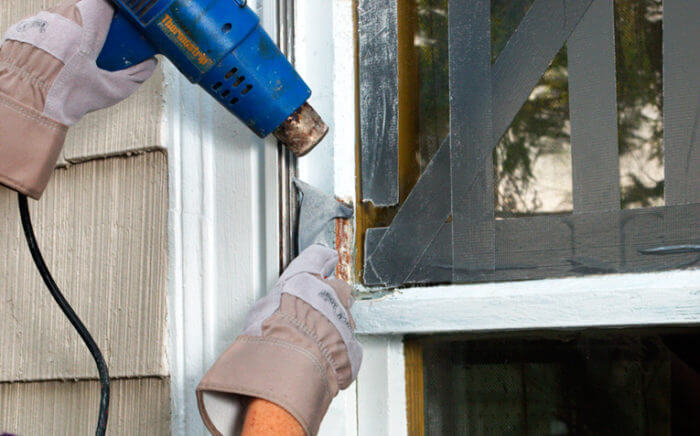
- Apply heat. Much like warm water softens tape, heat can help melt stubborn adhesives without damaging the surface of your floor or wall. Just one minute with a hairdryer, heat gun or even a blow torch will do the trick. Gently scrape off the adhesive while you apply heat on the surface of your floor or wall. Once the surface is cold, the construction adhesive tends to harden, so it becomes difficult for you to remove it without damaging your floor or wall.
- Apply pressure. Stubborn construction adhesives on rocks, bricks, concrete, and other hard materials can be removed by blasting the surface with high-powered water pressure system or through sandblasting. Water pressure and sandblasting work well, but they can also leave some marks on the surface of the rock, bricks, and other hard materials, so keep that in mind.
- Brush it off. Do not use soap on stone surfaces such as bluestone, brick, concrete, granite, limestone, terrazzo, and masonry tile. It will leave a hard-to-removes scum. Instead, mix together a solution of laundry detergent or baking soda with a little water to form a paste. With a soft brush (a toothbrush is good for small areas) gently spread the solution over the gummy portion until it is removed, and then rinse with clear warm water
- Alcohol to the rescue. Consider using a little rubbing alcohol, which is a non-solvent for pressure-sensitive adhesives. When you apply rubbing alcohol, the adhesive residue will lose its adhesion and will precipitate. This can also work with acetone, or nail polish remover. Keep in mind that alcohol or acetone may damage painted surfaces, so be careful when using these substances.
- Commercial products. Should these methods not work, some contractors we know swear by Goo Gone or Goof Off.
- WD-40. Use a rag with a bit of texture to it — for example, terry cloth as opposed to an old t-shirt — and soak a small area of it with WD-40, then scrub at the residue. If there is a lot of residue, you can spray the residue and let it sit for just a minute before scrubbing. Obviously, don’t do this on anything that the oil in WD-40 would harm! After removing the residue, it’s really important to wash off any WD-40 remnants with soapy water and dry before reapplying new adhesive.
How To Prevent Tape Residue
First, it helps to know why tape sticks and what role your surface plays in adhesion. Only than can you choose the correct tape. Duct tape on drywall? Not a good idea. Some people prefer to use Gaffer’s Tape to duct tape because it leaves far less residue. That’s true — it’s wonderful tape — but it’s also much more expensive than duct tape and it isn’t always the right solution for a construction project. All this to say that a little research will go a long way in preventing any sticky issues.
Always, always clean and dry your surface before applying tape. Dirt, grease, lint, old paint, wet paint, plaster… it all increases the probability of extra adhesion (a.k.a. Leftover residue), but more importantly, it’s can be the reason that makes the tape fail. You could also consider updating your tape. Removing old tape, cleaning the surface and applying fresh tape reduces the adhesion build-up. This is especially true of masking tape.
Last, but not least, there are specialty tapes specifically designed to leave no residue (i.e. stucco tape). If residue issues create more work on site, it may be worth considering a more expensive tape that does the job properly the first time. Sometimes the true cost of the project isn’t just the price of the tape, but the labor it saves as well.
Still not sure which tape to choose? Download our PDF, The Secret to Choosing The Right Tape, and browse our selection of high-quality tape solutions! To learn more about how ECHOtape can help you, contact us with any questions. We love to solve tape challenges!
Click here for our complete selection of insulation tapes.
Also, check out some of our most popular tapes:
Outdoor double sided tape
Thermal tape
FSK tape